FOOD SAFETY

FOOD SAFETY

The study of Food Safety and Sanitation is of utmost importance for the protection of the health of the consumers, you and me and the entire public or citizens.

Food Safety and Sanitation refers to food handling practices for public health. It is the practice of keeping foods from cross-contamination, storing perishable food at the appropriate temperature and heating food to a temperature that will inhibit bacterial growth.

Food safety is a scientific discipline handling preparation and storage of food in ways that prevent food borne illness. These include a number of routines that should be followed to avoid potentially severe health hazards. For a restaurant, sanitation focuses on wholesome food and beverages that are prepared and served in an environment that is free of disease-causing organisms and other harmful contaminants.

At one time or another, we may have suffered from a flu caused by a food borne illness. Most food borne illnesses contracted at restaurants go unreported because people often incorrectly assume that it is just a touch of flu, without realizing that almost everyone who ate that particular dish at the same restaurant got the same flu.

Health department inspections are incredibly important to the life and reputation of any food service operation in the food service industry. From time to time, the National Food and Drug Administration Control (NAFDAC) pay unexpected visits to various locations or factories where food service operation or production is being carried out. Sometime ago,, a team of NAFDAC staff paid and unexpected visit to a bakery and discovered that the dough for the bread was being kneaded on a very filthy table, in a very filthy environment by a group of young men who wore only trousers with no shirts on. Some of the men had open sores on their bodies and were sweating profusely. The sweat from their bodies dropped freely onto the dough they were kneading for the bread.

The NAFDAC agents subsequently sealed off the bakery immediately. In other to avoid inspection problems, onsite management and staff should treat food safety as the top priority.

Implementing good safety practices ultimately depends upon higher management which controls the amount of money available for training and equipment updates. Food safety competes for funding with many other corporate programmes.

MANDAZI RECIPE

They are bite size, tender and AMAZINGLY good. Don’t believe me make it and see for yourself. Before you make these addictive bites . Here are some tips to keep in mind before you proceed!!

- Make sure the water is not too hot. You don’t want it warmer than body temp.

- In order for your mandazi to be fluffy it has to double in size be patient with it (in might take longer some days depending on weather)

- If your mandazi does not rise in an hour, try turning on the oven to warm for 10 minutes. Then, turn it off and let the dough rise in the oven.

- If all fails mix rapid rise yeast into the dough and knead it .

- You may switch out evaporated milk with coconut milk

- It is best to use freshly ground cardamom for this recipe you get a hint of crushed seeds as you bite into the dough an enjoyable experience.

Ingredients

1 kg self raising flour,
3 eggs,
1/2 cup melted margarine or butter
1 table spoon ginger powder/cardamom/cinnamon (chose what works for you)
1/4 cup sugar or to your taste,
2 tablespoons lemon rind or orange rind
1/2 litter warm milk, you can also use coconut milk, almond milk, Mala or yogurt 
1 tea spoon vanilla essence or strawberry or pineapple essence


Method


Mix the dry ingredients, plus cardamon or any that you like ginger or cinnamon add the lemon rind and mix well. 

Add margarine and kneed well till you have breadcrumbs like mixture.

Beat eggs,then add the vanilla essence to the eggs then pour on the mixture as you kneed.

Then add milk bit by bit as you knead till you have a soft but not sticky dough.

Put the dough on a flat surface knead for about 3 minutes oil the bowl you were using to kneed,return the dough in and cover well with a clean towel let the dough sit from 2 hours to 12 hours. I Let mine sit overnight.

Then I took the dough and knead some more.

Role on the clean surface not so thick heat oil,don't let it to be so hot but hot, cut your dough in desired shapes and fry till brownish at both side. Refer to the photo above.


How to prepare chicken

Spicy chicken recipe

Ingredients

1 kilo gram chicken
1 teaspoon soy.
1 teaspoon oyster sauce.
1 teaspoon cumin seeds.
1 teaspoon coriander.
1 teaspoon tandoori masala.
1 teaspoon Spanish paprika.
Sage.
Thyme.
Salt to taste.
Fresh rosemary.
Fresh lemon juice.
Ginger.
Garlic paste.
Butter/Blue-band.
Chili sauce (optional).
Spring onions.

Method

Marinate your chicken with soy sauce teaspoon, oyster sauce teaspoon, cumin seeds, coriander, tandoori masala, salt, sage, thyme, Spanish paprika, fresh rosemary, fresh lemon juice, ginger, and garlic paste. Mix a teaspoon or less especially strong spice like cumin put half teaspoon.
Mix all and add a little water then thoroughly coat the chicken and wrap tightly then refrigerate for at least 3 hrs or more.
Then bake at 180 degrees for one and a half hours turning the chicken at 45 mins and draining the juices.
Once fully cooked take a pan put some BUTTER not oil butter but if you have no butter you can instead use blue-band. Melt it and add garlic mix well, add tomato ketchup and chili sauce again mix.
Put your grilled chicken in and mix till well coated.
Chop some spring onions mix and serve.

Home made crisps.


This is an easy recipe for homemade baked potato chips, a healthier option to traditional fried potato chips. Probably one of the best snacks ever without feeling the guilt. Line the potato slices in one layer and bake until crisp and golden brown.

Nutrition facts

Whole Chips - Calories:812, Fat:41.7 g, Saturated Fat:5.5 g, Carbohydrates:102.6 g, Sugar:6.4 g, Fiber:10.9 g, Protein:12.3 g, Cholesterol:0 mg, Calories from Fat 375, Sodium 194mg, Vitamin A 1%, Calcium 7%, Vitamin C 93%, Iron 26%, Nutrition Grade B, Percent Daily Values are based on a 2,000 calorie diet.

Home made crisps recipe

I really love this idea, they look so great! I am always trying to find healthier ways to do things and this is a great twist on the classic potato chip.

Ingredients
Potatoes.
Salty water
Crisps cutter.

Method
Peel potatoes.
Using a crisps cutter or mandolin cut the potatoes into crisps.
Let them soak in salty water for 10 minutes then rinse them and drain water under sieve and pat dry them.
Deep fry to slight golden fry

Foods To Be Avoided During Breastfeeding


Breastfeeding is the most essential process while taking care of your baby, Your child is ingesting the food which is eaten by you. The best way is to have balanced diet so that there would not be chances of a shortage. This will indirectly assist you & your child to get the good nutrition & vitamins which is ideally necessary. Babies do react in unfavorable ways if you have not eaten the right food.

Here are Some of the Foods To Be Avoided During Breastfeeding


  • Mothers need to avoid greasy, spicy foods which might hardly change the taste of the milk & will not fit the child.
  • They require to eat food that will aid them to recognize the flavor & give them the necessary elements.
  • Avoid drinking coffee, carbonated drinking water, chips, noodles, spicy sausages, burgers & also alcohol. They will merely cut down the chances of proper digestion & would indirectly affect the child's sleep pattern. Also chocolates contain caffeine.
  • Smoking during pregnancy has negative impact on child's nervous system.
  • Citrus fruits may irritate a still immature GI tract leading to fussiness, spitting up, diaper rash. Add mangoes & Papaya for Vitamin C intake.
  • Calciferous vegetables like cabbage, Broccoli, Cauliflower leads to irritable, gassy babies.
  • Eating garlic contained foods often leads to breast milk taking on the slight flavor of garlic. Garlic odor can enter milk up to 2 hours after a meal. Some babies may grimace or fuss at the breast if they detect garlic's aroma.
  • Proceed with caution before including peanut products in your diet. If you have a family medical history of allergy, it is worth being careful about diet & avoiding known allergens, like peanuts.
  • If eating a sandwich/pasta/any wheat based products before a nursing session results in your baby developing such symptoms as inconsolable crying, obvious pain or bloody stools, it could be due to wheat. To check his allergy, eliminate wheat based products for 2-3 weeks.
  • Corn allergy is also common. May be in the form of baby's discomfort or rashes.
  • It's a common knowledge that many babies are intolerant to cow's milk-based formula. But when you drink milk or eat other dairy products, these allergens enter your breast milk. Symptoms include colic & vomiting.
  • Eggs & soy also may become allergic to some babies.
  • Parsley & peppermint have certain compounds that may interfere with the supply of milk, if taken in a large quantities.
Source: Mrs. Rekha Champaneria: Dietitian & Diabetic Educator.

Good choices in canned foods

Fresh or frozen are not the only options for making a healthy meal. Recipes can also be made with canned foods.
The following are some of the healthier canned foods that can be added to recipes:
⊙ Tomatoes and tomato sauces.
⊙ Fish, such as sardines, salmon, herring, and tuna.
⊙ Chicken.
⊙ Vegetables such as pumpkin.
⊙ Beans, especially kidney, pinto, and navy beans. To reduce sodium (salt) in canned beans, place them in a strainer and rinse with cold water.
⊙ Fruits, such as berries, pineapple, and peaches.
Use the percent Daily Value (%DV) on the Nutrition Facts label to limit sodium. Remember, 5 percent DV or less is low and 20 percent or more is high. Also, read the ingredient list to make sure that added sugars (caloric sweeteners) are not one of the first few ingredients. Examples include brown sugar, corn sweetener, corn syrup, dextrose, fructose, and fruit juice concentrates.

HOME-MADE PEANUT BUTTER

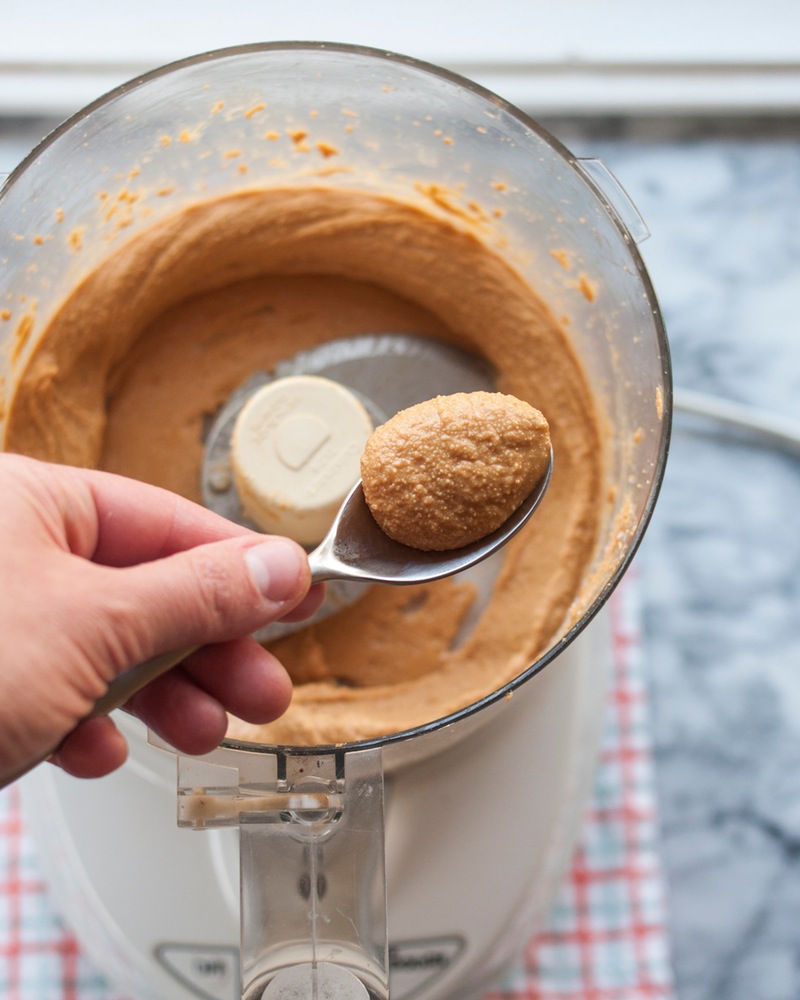
On some level, you probably already know that, sure, it's pretty easy to make your own peanut butter. But if you've never actually made homemade peanut butter, I don't know if you quite understand how truly, incredibly, ridiculously easy it really is. Peanuts, meet blender. Blender, it's go time.

Peanuts go through a few stages on their way to becoming spoonable, spreadable peanut butter. At first the mix looks impossibly crumbly and dry in the bottom of your food processor, but let the blender go a little longer and it starts resembling actual honest-to-goodness peanut butter.

HOME-MADE PEANUT BUTTER RECIPE

INGREDIENTS:

1 kg groundnuts (raw).
4 tablespoons olive oil/peanut oil.
4 tablespoons honey.
2 teaspoons salt.
Cinnamon (optional)
Paprika (optional)


INSTRUCTIONS

Started off by blanching the nuts, this you do first by bringing water in a pot to a steady boil.

Introduce your nuts into the boiling water and let them boil for 1 minute, be careful here not to overcook the nuts.
When done with, strain the nuts of all the water.
Preheat your oven to about 175℃.
Go ahead and spread the nuts on baking tray,don’t you worry about crowding the tray.
Put it inside your oven and bake for 1 hour.
Be sure to check from time to time turning the nuts around for even roasting.
When done take them out of the oven and let them cool completely.
Now take the peels off your nuts.
You are done at this stage, however I took mine back to the oven for a further 10 minutes to achieve a darker smokier colour that I love on my peanut butter.
Divide this into two or if you have a powerful and enough blender you can do it in 1 batch.
Pulse your nuts in the blender until it starts to form lumps and begins resembling peanut butter.
Here introduce your oil, salt and honey.
Pulse further until smooth and consistent.
Scoop this up into a jar and seal.
It can be stored in a refrigerator for up to 3 months.
You can spice it up by adding cinnamon, paprika and other ingredients as you so wish.


10 REASONS WHY YOU SHOULD EXERCISE

If you’re looking for a little inspiration to get started then here are 10 reasons why exercise can improve your life.

1) More Energy: Although exercise in itself may be tiring, one of the major benefits of exercising is the fact that it’ll ultimately leave you feeling more energized. Studies have shown that regular exercise helps to reduce fatigue.
2) Increase Your Mood: Every time you exercise your body will release endorphins that help to make you feel good. Exercise really will give you a natural high!
3) Improve Your Health: There are so many health benefits of losing weight that it’s impossible to list them all here! By getting fit you’ll reduce the risk of diabetes, cancer, high blood pressure, stroke, heart disease and much more.
4) Improve Your Appearance: If being overweight or not being toned leaves you feeling unhappy about yourself then losing weight can help you to look and feel better.
5) Play with your kids: It takes a lot of energy to keep up with your kids. By losing weight and getting fit, you’ll be able to run around with them without constantly getting out of breath. This can be one of the most rewarding benefits of exercising: it helps you to enjoy life more.
6) Sleep Better: When you exercise more you’ll start to find it easier to get a good night’s rest. This adds to the energy boost that you’ll get from exercise in the long term.
7) Increase Your Strength and Stamina: Do you find it hard to go on long walks, even though you want to? Or maybe even carrying shopping bags up the stairs is a struggle? Exercise more and you’ll eventually be able to handle these activities with ease.
8) Reduce Stress: Exercise can hugely reduce stress levels. If you regularly suffer from stress - or even mental health issues such as depression and anxiety - regular exercise can help to reduce your symptoms.
9) A Sense of Achievement: When you start to exercise and see the improvements you’re making week on week, you’ll really get the feeling that you’ve achieved something worthwhile!
10) Keep Your Independence Later in Life: The more you can exercise now, while you’re still able, the more you can reduce the impact of certain health problems later in life. In short, keeping fit and healthy will help you to keep your independence as late into life as possible.
We all know about certain benefits of exercising - above all, that it’s good for us. But this isn’t always enough to get us motivated into actually doing it. Chances are that if you are reading this you are either interested in a better fitness and health routine or you are already participating in one.

So how much will you need to work out to feel these benefits of exercising?

That all depends on your current fitness levels. The good news is that just 30 minutes of exercise a day is enough to improve your health drastically. So what are you waiting for?!

WHAT TO EAT WHEN PREGNANT

Dried Beans & Lentils: All women need 10 extra grams of protein a day during pregnancy (for a total of at least 60 grams); beans and lentils are an excellent source, with about 15 grams per cup. They're also high in fiber, which helps to combat constipation.
Non-fat Milk: Your body absorbs roughly twice as much calcium from foods while you're pregnant, so your daily needs remain the same. But since most of us get too little calcium to begin with, drinking more nonfat milk is a smart move. Each 8-ounce glass supplies about 30 percent of the recommended dietary allowance of 1,000 milligrams.
Bananas: Bananas are rich in potassium and offer quick energy to fight off pregnancy fatigue. "They're also easy on your stomach if you're nauseated," says O'Rourke. Slice them up into cereal or whip one into a breakfast smoothie with yogurt, berries, ice, and a splash of orange juice.
Lean Meat: Your daily iron needs double during pregnancy, so it's important to include plenty of iron-rich foods now. "If you don't have good iron stores, you're more likely to feel tired," warns Jo Ann Hattner, RD, a dietitian. Meat delivers a form of iron that's easily absorbed by your body.
Cheese: Soft cheeses are off-limits, but varieties such as cheddar and mozzarella can be a big help in meeting your calcium requirements -- each ounce contains between 150 and 200 milligrams. Cheese is also high in protein.
Eggs: Many women develop aversions to meat while pregnant. Eggs are an excellent alternative protein source, since they contain all the essential amino acids your body needs, says Hattner. There's nothing better for a quick dinner than an omelet with lots of chopped vegetables and a bit of cheese. If cooking aromas make you feel sick, hard-boil a batch of eggs to keep on hand in the refrigerator: Eat them whole for grab-and-go breakfasts and snacks, or chop them up into green salads.
Leafy Greens: Cooked spinach has high levels of folate and iron, and kale and turnip greens are both good calcium sources. Increase the nutrient value of your salads by passing up traditional iceberg in favor of darker-colored lettuces (the deep colors signal higher vitamin content). You can also add greens to a sandwich or stir them into soups and pasta dishes. Reduce on boiled greens and instead just steam them or better eat them raw.
Oranges: They're packed with vitamin C, folate, and fiber, and since they're nearly 90 percent water, they'll also help you meet your daily fluid needs (skimping on your fluid intake can leave you feeling fatigued).
Dried Fruit: It's a tasty, portable snack that's especially helpful when you're craving something sweet. Choose dried fruits such as apricots, cherries, and cranberries (which can also help to prevent urinary tract infections), but stay away from dried bananas, since they're processed in oil and loaded with fat.

Doughnuts Recipe

It is not a must that all doughnuts should be round. Today am going to show how to prepare a different kind of doughnut.

Ingredients:
Milk - 3/8 cup [warm]
White vinegar - 2 table spoon
Sugar - 1/2 cup
2 eggs
Vanilla extract - 1/2 table spoon
Butter - 1/2 kg
All purpose flour - 300 gram
Salt - 1/4 tea spoon
baking powder - 1/2 table spoon.

METHOD:
Stir in the vinegar into milk and let stand for a few minutes. In a bowl, cream together the shortening and sugar. Add milk and knead gradually, the dough should be hard and coarse, let it stand for for 30 minutes, then cut into your desired shape and deep fry until both sides are golden brown.
Serve with spiced tea!

Minced Meat with Rice Recipe

Minced meat has been very tricky for some of you to prepare hence you avoid cooking it, but after reading through the recipe, you will notice that it's not as hard to cook as you thought.

Ingredients:
Minced meat - 1/2 kg
Tomatoes - 3[chopped]
2 onions [chopped]
Garlic-ginger paste - 1 table spoon
Garam masala - 1/2 tea spoon
Black pepper - 1/4 tea spoon
Tomato paste - 1 tea spoon
Potatoes - 3 big pieces
Carrots - 3 pieces
Maggi cubes - 2 blocks
Curry powder - 1/2 tea spoon

METHOD:
Boil the meat until tender [do not add water]. In a separate sufuria or cooking pot fry onions until they turn golden brown, add garlic-ginger paste, stir, then add tomatoes and the remaining spices, then add the carrots and the potatoes, stir and add tomato paste and maggi cubes, stir to combine well. Add the meat add just the seasoning and add a little water so that it doesn't become so thick, simmer until the potatoes and carrots are soft but not mushy.
Serve with vegetable rice or with white plain rice as shown in the photos above.


How to Boil Maize Corn

NOTE: Please, never over-cook your fresh corn! The best way to boil maize is with it's cover.

Boiling is the quickest, easiest, and tastiest way to prepare fresh corn. Too many people do not know how to correctly boil fresh corn on the cob. It is a very easy technique and produces the most delicious corn on the cob. Corn should be cooked quickly and not left to sit in the boiling water very long. Fresh corn is at its best when it is very milky inside. If overcooked, it will dry out quickly.

Boiling Corn On The Cob - Perfect Boiled Corn Recipe:


Recipe Type: Corn, Vegetables
Yields: serves many
Prep time: 10 min
Cook time: 5 min

Ingredients:

Fresh ears of corn
Butter
Salt and pepper

Method

Choose a pot large enough to hold the amount of corn you want to cook, with room for water to cover the corn. Cover pot and bring cold unsalted water just to a boil over high heat. Some people like to add a little sugar to the boiling water, but never add salt as it will only toughen the corn.

Add husked corn ears and bring the water back to a boil on high heat (covered or not). Since corn tends to float on top of the water, I cover the pot. This helps the water come back to a boil faster and helps the corn cook. It will take approximately 3 to 4 minutes to bring the water back to a boil. Once the water comes back to a boil, immediately remove the corn ears from the water. The corn is now cooked perfectly and NOT overcooked.

Boiling time is a matter of taste; some people like to just boil them a minute or two to warm their corn on the cob, leaving the kernels crisp and fresh. Others like to let them boil 3 to 10 minutes for softer kernels. How long you cook your corn on the cob depends on your tastes.

Remove the cooked corn ears from the hot water with tongs. Serve with butter, salt, and pepper. Some people like to roll their hot corn on a stick of butter, others spread the butter with a knife. Your choice!

Simple Vanilla Cake

Makes yummy traditional style cakes, easily adaptable. A moist cake drenched with vanilla syrup. Use as the basis for a range of fabulous celebration cakes

Nutrition: per serving

  • kcal399
  •  
  • fat21g
  •  
  • saturates12g
  •  
  • carbs48g
  •  
  • sugars27g
  •  
  • fibre1g
  •  
  • protein6g
  •  
  • salt0.31g

Simple Vanilla Cake Recipe

Simple Vanilla Cake Ingredients:

4 eggs.
1 cup sugar.
1 tbsp baking powder.
1 tsp. vanilla sugar or vanilla essence.
¾ cup oil.
¼ cup milk.
1 ¼ cup baking flour, Whichever you prefer.

Simple Vanilla Cake Method:

Beat the eggs, sugar and baking powder until fluffy.
Add the oil and the milk, continue beating for a minute.
Then still at low speed add the flour in two additions mixing well after each addition.
Stop the mixer and scrape out the sides and bottom and continue mixing.
Pour the batter in a prepared baking sheet.
Bake at 350 degrees oven for 30 to 40 minutes.
Let the cake cool before cutting it.
Enjoy it with a cup of tea.

Vanilla Cupcakes

Vanilla cupcakes are easy to bake, gluten free, and would go perfect with a steaming cup of tea. Vanilla cupcakes using rice flour take only 30 minutes to prepare from batter to your plate.
If you want to make them with all purpose flour we've got that recipe here at the bottom too.

Vanilla Cupcakes Recipe

Ingredients:

For the cupcakes:
1/2 cup margarine.
200 gm. sugar.
3 eggs.
225gms rice flour (make your own by grinding Daawat Basmati Rice into a fine powder).
1 1/2 tsp baking powder.
A pinch of salt.
125ml milk.
1 tsp. vanilla essence.

For the icing:
1 cup unsalted butter.
3 1/2 cups icing sugar.
1/2 tsp. vanilla essence.
2-3 tbsp. milk.
Food coloring of your choice.

For cupcakes using all purpose flour:
Ingredients:
8 tbsp. margarine.
1 cup sugar.
3 large eggs.
1 1/2 cups all purpose flour.
1 tsp. baking powder.
A pinch of salt.
1 tsp vanilla essence.
3/4 cup milk.

Method for the cupcakes:

1) Cream margarine and sugar for 5-8 minutes.
2) Add one egg at a time while mixing until incorporated.
3) In a bowl, mix together flour, baking powder and salt.
4) Add in 3 batches the flour mixture into the egg, margarine and sugar mixture followed by milk making sure to start with flour and end with flour.
5) Mix in vanilla essence and mix to make sure there are no lumps of flour.
6) Line a cupcake tray with cupcake liners and fill 3/4 of the liners.
7) Bake in an oven at 180C for 17-20 minutes or until a toothpick inserted into the cake comes out clean.
8) Let the cupcakes cool completely before icing.

For the icing:

1) Beat the unsalted butter until fluffy.
2) Add the icing sugar in 3-4 batches making sure to beat for 2-3 minutes in between each addition.
3) Add vanilla essence to flavor and milk 1 tbsp at a time to lighten up the icing. If the icing is still too thick, feel free to add some more milk.
4) Add a few drops of your favorite color, spoon the icing into a piping bag and pipe onto the cupcakes.

Yummy!!!

Traditional Vegetable Rice

This vegetable fried rice is an easy one to follow, can be made with any sauce one likes. It can be made in a jiffy with basic ingredients and rice.
Prep time 10 minutes.
Cook time 45 minutes.
Total time 55 minutes.
Recipe type: Vegetarian
Serves: 4-6
Ingredients:
for the sweet potato:
1 large sweet potato, peeled and chopped.
2 tablespoons oil.
1 teaspoon smoked paprika.
½ teaspoon each ground cumin and ground coriander.
Salt, to taste.
For the peppers and onions:
1 green, red and yellow bell pepper, chopped.
1 red onion, chopped.
1 garlic clove, crushed.
2 tablespoons oil.
1 teaspoon dried oregano.
Salt, to taste.
For the bowl of rice:
Steamed dawaat rice or any other rice you prefer.
Diced avocado dressed in lemon juice and salt
sour cream.
Fresh chopped chillies.
Coriander.
Instructions on how to prepare
Pre-heat the oven to 200°c.
In a bowl, combine all the ingredients for the sweet potato and mix well. Transfer to a large baking sheet.
In the same bowl, combine the peppers, onions and flavorings and mix well. Transfer to the same baking sheet. (Keep the peppers and onions to one side, sweet potato to the other.)
Place the vegetables in the oven and allow to roast for 30-45 minutes until they are cooked through, soft and caramelized.
To make the burrito bowls, place rice in the bottom of a serving bowl then top with the vegetables, avocado and sour cream.
Finish with chillies (optional) and coriander then serve.
Enjoy.

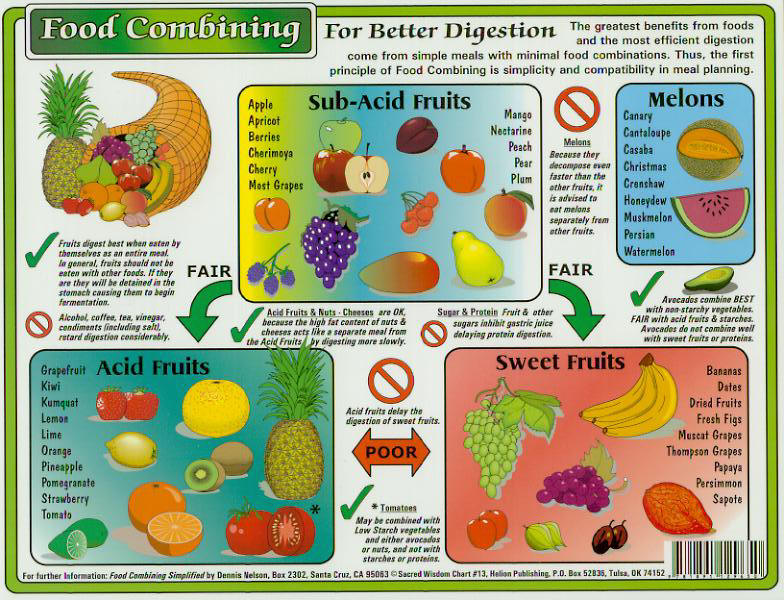
Incompatible Food: Terrible Food Combinations That Cause Digestive Problems

One in three people in the world, has digestive problems. Studies indicate that correctly combining foods is critical, not only for providing your body with essential nutrients, but for eliminating heartburn, uncomfortable gas, and acid reflux. Food is processed in the mouth, stomach, and small intestine using two types of digestion; mechanical (chewing) and chemical. The two types of chemical digestion are markedly different. Acid digestion is required for proteins and alkaline digestion is needed for carbohydrates.

Milk followed by fruits & vice-versa.
Sour substances with milk.
Milk with salt, horse gram (Kulthi), green gram (moong), & cow gram (chawli)
Wheat preparation in gingely oil (til oil)
Hot drinks after alcohol, curd & honey.
Banana with curd & buttermilk.
Chicken with curd, milk & milk products.
Fish with milk & milk products.
Ghee kept in bronze vessels.
Radish with jaggery.
Fish with jaggery or sugar.

    DO'S & DONT'S:

    1) Walk a while (100 steps) after meal to help digestion.
    2) Don't eat fruits immediately after meals, as it makes liver unhealthy, leads to bloating.
    3) No travelling, exercise & sexual intercourse within 1 hour after meals (as more blood supply to digestive system).
    4) Don't suppress appetite, as it leads to body pain, anorexia, lassitude, vertigo, general debility.
    5) Avoid meals when thirsty & water while hungry.
    6) Don't suppress thirst as it leads to general debility, giddiness & heart disease.
    Food combination
    source

    SOURCE: MRS. REKHA CHAMPANERIA: DIETITIAN & DIABETIC EDUCATOR.

    Crockpot Indian chicken

    Crockpot Indian chicken Recipe

    Sauce: Ingredients
    1/2 cup chopped onions.
    3 garlic cloves (cut 1 half).
    1/2 tsp. Fresh ginger.
    1/2 can petite diced tomatoes.
    1 cup hot water.
    1/2 tsp. salt.
    1/4 tsp. white pepper.
    1 tsp garam masala.
    1/2 tsp curry powder.
    1/2 paprika.

    Method
    Sauté the onions until light brown then add everything in order. Let it boil before adding the seasoning. Boil on medium for about 30min.
    Then pour into a pre sprayed crockpot.
    Add:
    1/2 can coconut milk
    1/2 cup finely diced onion
    Add 3 pre-cut chicken Breasts.
    Cook on low for 4 hours. Or high for 2 1/2 hours.
    Serve with white rice (I made it with cauliflower rice)

    Chips Masala

    Ingredients:
    French Fries (potato chips) already cooked.
    2 tbsp. chopped coriander (dhania).
    1 250 ml Jar of chili sauce.(optional)

    Method
    In a frying pan pour 1 jar of chili sauce on medium heat.
    Stir in chopped coriander (dhania) and French Fries (potato chips).
    Serve immediately!

    Veggies and minced meat with spiral pasta.

    Here’s a terrific recipe that makes a complete meal, with something from all the food groups! The pasta does not require any precooking, so you can save preparation and cleanup time.

    INGREDIENTS:
    1/2 Kg mince meat (lean).
    Table spoon of Olive oil.
    1/2 tea spoon Cumin powder.
    1/2 tea spoon Turmeric powder.
    Salt to taste.
    4 grated tomatoes.
    1 diced red onion.
    1 diced Zucchini.
    2 diced carrots.
    1/2 hand full boiled peas
    Potatoes or cabbage


    METHOD:
    Put mince in a pan cover on low heat until it browns
    Add Olive oil and diced onions tomatoes, turmeric and cumin powder let it cook then add all the veggies mix well let them marinate in the heat then slowly add water to cover and let it all cook until ready.
    Serve with pasta, rice or chapati


    Polycystic Ovary Syndrome (PCOS/PCOD)

    Polycystic Ovary Syndrome (PCOS/PCOD)

    PCOD is a condition that prevents the Ovaries from working properly.

    Causes of Polycystic Ovary Syndrome (PCOS/PCOD)

    • Hereditary.
    • Having a family history of Type-2 Diabetes.Abnormal hormonal levels.
    • Excess weight & Fat.

    Symptoms of Polycystic Ovary Syndrome (PCOS/PCOD)

    Include: 
    • Absent irregular periods. 
    • Reduced fertility.
    • Acne.
    • Weight Problems.
    • Thinnig hair.
    • Excess body hair on the face, forearms, lower legs, around the nipples & Lower abdomen (Hirsutism).
    • Miscarriage as women suffering from PCOS usually have a raised levels of the luteinising hormone.
    • Weight gain as cells are resistant to the insulin controlling sugar levels , this means the sugar isn't used properly & is stored as fat instead.

    Long-term Risks of Polycystic Ovary Syndrome (PCOS/PCOD)

    • Type-2 Diabetes.
    • Sleep Apnoea.
    • High Blood Pressure.
    • High Cholesterol.
    • Mood Swings.
    • Depression.

    Solutions to Polycystic Ovary Syndrome (PCOS/PCOD)

    Diet: A nutritious Diet will help to reduce the risk of developing symptoms of PCOS, including weight management & Helping to regulate Insulin Levels.

    Fruits are vital in providing the body with the nutrients needed to combat the symptoms of PCOS. If concerned about the rise in blood sugar & insulin levels caused by fruit, enjoy a handful of seeds or nuts as aside snack.

    The protein in the seeds can help regulate the rising glucose levels. Increase vegetable intake for fiber, minerals & antioxidants. Opt for Complex carbohydrates & healthy fats.

    Unsaturated fats are essential in managing the symptoms of PCOS. Essential fatty acids ( EFAs) are vital in PCOS as they help to maintain cell wall, which absorbs the nutrients we need. EFAs also help to re-balance hormones, manage weight & can help Fertility.

    Magnesium rich foods are also important to include. This is because a deficiency in Magnesium has been linked with an increased risk of Insulin resistance. Dark, leafy vegetables, Nuts, seeds will give you magnesium.

    Smaller, more frequent meals to help control blood glucose levels.

    Have balanced meals including carbohydrates, protein & fat.

    Daily one hour walk.

    Limit sugars & enriched carbohydrates. Complex carbohydrates take longer than enriched carbohydrates to digest & absorb .

    Eat protein & fat with every meal or snack . Protein has a effect on the sugar released from carbohydrates into the blood.

    Vegetable pashtida with potatoes, carrots, broccoli, spinach, parsley, and eggs.

    Ingredients:
    Vegetable: Spinach
    Potatoes.
    Carrots.
    Broccoli.
    Parsley.
    4 eggs.
    Salt to taste.
    Pepper.
    Turmeric.
    Cooking oil.

    Method:
    Put all the veggies in a food processor. Place mix in bowl and add eggs (I used 4 eggs). Add salt, pepper, and turmeric.
    Put a light layer of oil in a pan. Add mix and cook on medium low for about 10 minutes or until brown. Flipping it is a bit tough but I moved it into a plate, put another plate over and then slid it back into the pan.
    Let the other side get brown its ready to eat.
    Healthy and tasty.

    Sausages in Mustard sauce

    A little planning and imagination can go a long way with this budget-friendly sausages and mash meal.

    This recipe is so adaptable, so change the mustard and the sausage to suit your own taste; for example, if you like spicy sausages why not marry them with sweet mustard?

    Sausages in Mustard sauce recipe

    Sausage Ingredients:
    Sausage-Cut in large chunks
    Onion-Sliced
    Garlic-Sliced
    Mustard(I used whole grain)
    Fresh Cream/Cooking Cream

    Method:
    On a hot pan, cook the sausage with little oil till evenly browned on all sides.
    Reduce the heat then add the onions and garlic.
    Let the onions cook till soft and slightly brown.
    Add the mustard the stir well till fully mixed with the sausages.
    Add a little water to make a sauce and simmer while covered for about 2 minutes.
    Adjust the seasoning and add the cream. If the water has reduced, add a little more together with the cream.
    Add cream to desired taste to slightly neutralise the strong mustard flavour.
    Serve hot with favorite accompaniment.

    Fruitcake Recipe

    There are many different varieties of fruit cake and one common thing in them is the inclusion of the dried fruits like the the raisins or candied fruits like glacé cherries, mixed orange and lemon peels, nuts and sometimes spices and optionally soaked in spirits for a longer shelf life and taste.

    What I have here is a simple cake recipe with a soft crumble with the addition of the fruits. The amount of fruits is dependent on one's taste and preference.

    When it comes to baking, the cooking time is dependent on the size of cooking tin and what you need to look out for is a evenly browned top and a tooth pick/small knife inserted comes out clean and dry. If the inside is not cooked through and the cake is already browned, reduce the heat to 160ºC.


    Ingredients:
    ➔300 g Unsalted Butter/Margarine Softened.
    ➔250 g Sugar.
    ➔1 tsp Vanilla extract/essence.
    ➔Pinch of salt (If using unsalted butter/margarine).
    ➔5 Eggs.
    ➔380 g Plain flour.
    ➔4 Tsp. Baking Powder.
    ➔150 g Mixed Dried Fruits (Mix equal amounts of raisins, orange peels, red glacé cherries to make 150 g) You can add more fruits if you like.

    Method:
    Pre-heat the oven to 180ºC/350ºF. Grease a rectangular/square tin and line with a greaseproof paper or simply dust with a thin coat of flour.

    Place the butter in a bowl and beat till smooth then stir in the sugar, salt and vanilla extract until thickened and smooth.

    Add the eggs one at a time whisking vigorously each time before the next.

    Sift the flour and baking powder into the butter and egg mixture and mix well until all the flour is not visible. When done the batter will be thick.

    Add the mixed fruits and mix into the thick batter. (You can add more fruits if you feel you need more).

    Bake for about 25 minutes when using a large rectangular pan or until the cake has browned on top and firm when pressed at the centre. You can also check by dipping a small knife or toothpick at the centre or the cake, which should come out dry when ready.

    Leave to cool in the tin for about 10 minutes then transfer to a wire rack. Divide accordingly and dust with icing sugar.

    NOTE: The baking tin will determine the baking time and what needs to be noted is the smaller the tin the longer the cake will take to cook. The bigger the tin the more the cake mixture is spread out and the cake will bake faster.

    Avoid opening the oven until the cake is set (about 20 minutes) into baking. This is to avoid the cake from collapsing at the centre due to the introduction of cold air into the oven that caused the cake to collapse.

    A quick and easy way to enjoy your Salmon.

    Heat your pan hot with little oil. Your choice of pan will influence your final result. Use a good quality non stick pan like TEFAL

    Salmon Recipe

    Season generously with salt and freshly ground pepper on one side.
    Place the fish on the hot pan on the side with the seasoning.
    Season the second side as the first side cooks. Cook until it browns evenly over medium heat.
    Turn to cook the second side.
    Serve hot with a salad or your favorite accompaniment.

    How to Prepare Roast Butternut Coconut Soup

    Here is a tasty creamy butternut coconut soup that will leave your taste buds excited. Hope you get to try the soup out at home.

    • When you want to peel a butternut first clean and cut both ends to be able to make it sit when peeling it.
    • Cut into two so that you have two pieces.
    • With a sharp knife, start peeling along the curves of the butternut. You can also use a vegetable peeler.
    • Take care not to take too much flesh off the butternut. Apply the cutting motion(move your knife back and forth) not just press the knife downwards when peeling
    • When done you want to avoid the whitish or green streaks like above as they tend to be hard and take tome to cook. Trim them off.
    • Nice and ready. If you use a peeler to peel your butternut, You will be left with alot of the green and white hard parts of the butternut. If you prefer the peeler, then peel it til it looks like the picture.
    • Repeat the same on other piece while trying to cut along the curves of the butternut.
    • Cut the bottom part into 2 to reveal the seeds.
    • Using a spoon and a little muscle, scrap off the seeds and 'strings' Nice and clean.
    • Dice the butternut to desired size ready for cooking.
    • In a roasting pan, season the diced up butternut and add little oil.
    • Into the hot oven it goes at the highest heat you can set your oven. It should take about 30 minutes in the oven.
    • After about 15 minutes, stir the butternut around to ensure all sides start to brown.
    • If your oven, like mine, was not hot enough you could transfer the butternut to a hot pan and finish it there as you need to have blackened pieces to get that roast flavor.
    • The pan should just have very little oil to prevent the butternut from sticking.
    • If you DON'T' HAVE AN OVEN, you can cook the butternut on the pan on medium heat while covered then increase the heat to high to get the butternut brown.
    • Roast Butternut. Whether you use a pan or oven, the idea is to have you butternut looking like this.
    • Set it aside for use shortly.
    • Meanwhile, have your onion, ginger and garlic sliced and ready. Add more ginger or garlic if you want a ginger/garlic taste.
    • On a suitable pot, cook the onion, ginger and garlic until soft with minimal oil/butter.
    • This should take about 2 minutes
    • Add the browned butternut and give a stir.
    • Let to cook for about 1 minute.
    • Add 750 ml of water. Bring to boil and simmer for about 5 minutes while covered. You can add coconut at this stage and if not sure how much is enough, you can always add more later.
    • Turn off the heat and allow to cool slightly.
    • Blend until smooth in batches if it cant fit your blender.
    • Return to the heat and and bring to boil, adding some coconut cream/milk to taste.
    • Give a quick stir, taste and adjust the seasoning.
    • Garnish with a swirl of cream and coriander leaf.
    • Also you can try another serving suggestion since they are quite a number. Enjoy!!


    Peanut sauce fish and spinach recipe

    This is probably the best spicy peanut sauce I've ever made, and I've tried at least half a dozen recipe before this. The balance of flavors peanut sauce fish and spinach is nearly perfect.
    Ingredients
    Peanut sauce fish.
    Deep fried fish.
    Ripe tomatoes.
    1 big onion diced.
    1 tea spoon fish masala.
    1 tea spoon garlic and ginger past each.
    3 scoops of peanut butter smooth or crunchy will do just fine.
    Salt and pepper to taste.
    1 bunch diced coriander leaves (dhania).
    1 tablespoon cooking oil.


    Procedure
    Fry your onions, till translucent, add garlic and ginger paste, then fish masala then add your tomatoes, you can blend let the tomatoes cook till soft, add the fish, then add water to your peanut and let it dissolve into a smooth paste and add to the tomatoes, keep stirring as it sticks so fast, if very thick add some water and salt to taste spoon some of the stew and coat the fish on top, cover and let it simmer on medium heat for about 8 minutes, keep checking if the soup reduces or too thick adjust to your liking you can also add more peanut butter to it. Add your nicely chopped coriander leaves and serve with cassava and maize ugali.


    Chicken Recipe that can Heal Flu

    So I know not many of you knew that chicken soup can heal Influenza/Flu .. Here's a recipe of that kind of home remedy.

    Chicken soup recipe

    Ingredients

    1 kilo gram chicken
    Carrots
    Celery root
    Leek
    Parsley
    Salt to taste.
    Vegetable bouillon 

    Method of preparation

    You'll need a whole chicken for preparing soup(kuku kienyeji) Cut into preferred pieces and boil for about two hours or until soft.
    Then carrots, celery root, leek and parsley. Cut them into pieces
    Add to the chicken together with salt to taste and chicken or vegetable bouillon and cook for 15 minutes.
    Stir in between.
    The chicken is now ready.

    6 products and ways to get rid stretchmarks and scars

    Treating from Inside
    1) Aloe Vera Gel: Our skin has a replenishing period of 21-28 days within which new cells move from the bottom layer (hypodermis) to the top layer (epidermis) of the skin. Therefore, in order to have good healthy skin, it is important to provide these new cells with all the nutrients/building blocks they need from the inside.
    Aloe Vera Gel contains a rich supply of these nutritional building blocks that will help you acquire healthy skin. The skin cells can utilise these nutrients to effectively fight against the daily effects of aging.Another benefit of drinking Aloe Vera Gel is that it dilates the capillaries in the skin tissue, which results in an improved supply of oxygen to the skin cells. An improved oxygen supply leads to faster formation of collagen and elastin repair, hence increasing the strength, elasticity and synthesis of skin tissue.Finally, Aloe Vera Gel's high water content is a great way to hydrate, moisturise and rejuvenate the skin from inside. As a result, scars and the formation of keloids are reduced.

    2) A-Beta-CarE: Forever A-Beta-CarE is an essential supplement with Vitamins A, E and the antioxidant mineral Selenium. The benefits of these 3 components have been well documented and a quick search on Google will reveal them. However, we are more interested in what they do for a skin damaged by stretch marks or scars.
    Vitamins A and E, and Selenium are all powerful antioxidants, protecting the cell membranes and in a larger picture - the body tissues from the damaging effects of free radicals and ageing effects.So think of these antioxidants as a bulletproof vest shielding you from bullets. They also repair and maintain healthy skin, preserving the texture of the skin.
    In other words, A-Beta-CarE will help protect the new skin cells that are formed in the bottom layer of the skin, shielding them till and after they get to the epidermis.

    3) Nature-Min: Nature-Min is a multi-mineral supplement that provides minerals and trace minerals in a perfectly balanced ratio - essential for them to work effectively. 4% of our body weight is made up of minerals and they play an essential role in almost all process and reactions both in the skin and the rest of the body.
    Nature-Min contains the following minerals: Calcium, phosphorus, Magnesium, iron, Zinc, Manganese, Copper, Iodine, Molybdenum, Selenium and Vanadium.These minerals are essential for skin development and function, forming essential components of enzymes in the skin.They absorb and filter UVA and UVB rays, reducing the amount of sun rays that penetrate the skin. This is important because the damage caused by stretch marks is usually worsened by overexposure to harmful sun rays.Minerals increase the antioxidant defence mechanisms in the skin.They also enhance the healing process in the skin by accelerating cell regeneration which is important for damaged skin.
    The importance of minerals to the skin cannot be overemphasised. The main barrier faced by most people is consuming the right amount and quality of minerals in their everyday diet. Nature-Min provides you with the correct quality and quantity of minerals in the right ratios.

    Treating from Outside

    1) Aloe Moisturizing Lotion: Aloe Moisturizing Lotion has outstanding humectant and moisturising properties, and it is loaded with aloe vera, collagen and elastin, all crucial for soft and elastic skin.
    Aloe vera has a high penetration power, penetrating the skin layer 4x faster than water. It has the unique ability to transfer water deep into the skin tissue, making it a perfect hydrating and moisturising agent.One of the most important properties of Aloe Moisturizing Lotion is that it stimulates cell division and accelerates tissue regeneration. This is very important because the skin cells damaged by stretching and injury (stretch marks and scars) can be quickly replaced.Like you know by now, cells of the epidermis renew every 28 days give or take. Aloe vera in Aloe Moisturizing Lotion through a direct effect on cell division factors, accelerates granulation of the skin tissue, hence causing faster regeneration of cells.Aloe also activates and enhances the function of fibroblasts, which are collagen-producing cells. A skin rich in collagen and elastin is much more elastic and less prone to damage from rapid expansion and stretching.
    Other benefits of Aloe Moisturizing Lotion include: regulating the pH levels of the skin; inhibits the multiplication of bacteria, viruses and fungi; acts as an anti-inflammatory agent and astrigent; and dilates blood vessels to improve circulation.

    2) R3 Factor: R3 = RETAIN, RESTORE & RENEW
    R3 factor is packed with a rich combination of aloe vera gel, soluble collagen, and alpha-hydroxy acids (AHA), fortified with vitamins A and E. All these are vital to help the skin retain its natural moisture, restore its resilience and renew its appearance.
    AHA also known as fruit acids is one of the most important components of R3 Factor. These fruit acids act as exfoliants that loosen the dead damaged cells on the skin's surface (as in the cases of stretch marks and scars) by dissolving the glue-like substances that bond dead skin cells together.Getting rid of these dead cells that usually create a barrier to moisturising creams means fresher and newer skin cells are exposed.The soluble collage and elastin improve the texture and elasticity of the skin as explained above.Vitamin A helps in the maintenance of healthy skin while Vitamin E is a powerful antioxidant which fights against ageing and damage from both external and internal factors.
    For those with lighter sun-sensitive skin, R3 Factor should be used as a 4 week treatment , preferably during spring and/or autumn to avoid intense sunlight.
    For those with darker non-sensitive skin, R3 Factor can be used all year round.
    R3 Factor should be used both in the morning and at night. Because it takes the skin 28 days to renew itself (an even longer as we get older), allow a similar amount of time to realise the full benefits of R3 Factor.

    3) Forever Alpha-E Factor: This is one of the best skin-replenishing agents out there. It is a light emolient fluid containing aloe vera gel, vitamins A, C and E (which are all powerful antioxidants), borage oil and bisabolol. This antioxidant fluid is designed to combat free radical damage which is the cause of 80% of skin damage.
    Forever Alpha-E Factor gives the skin a younger-looking appearance by moisturising the skin from within to deliver an perfect smoothness.Vitamin E protects the cell membranes of the skin cells from damage by free radicals.Vitamin A enhances the elasticity of the skin, reducing its susceptibility to damage by stretching.Vitamin C also enhances elasticity and goes a step further to prevent the formation of scar tissue.Lecithin in Forever Alpha-E Factor improves the suppleness of the skin, a benefit highly appreciated by ageing skin. Finally, Borage seed oil restores skin moisture, hence normalising and balancing dry skin while Bisabolol is essential for soothing sensitive skin.
    All these components work in synergy to repair damaged skin that is a typical characteristic of stretch marks and scars.

    All the products listed above will help you reduce the physical appearance of stretch marks and scars, reducing the cosmetic damage on your skin.

    Do not be one of those who sit back and complain all the time. Stand up and take action, do something about you stretch marks and scars if it is a nuisance to you. Don't let these cosmetic nuisances dictate your life, don't let them be the reason why you not 100% confident when it comes to your physical appearance. I call on you to take action, click the link below to discover what these products can do for YOU

    Thank you once again for taking your time to read this post. I am grateful the knowledge on this page didn't go to waste. If you liked what you read and found it informative, please do SHARE .

    HOW TO CLEANSE YOUR COLON

    A dirty colon represents a sick body. If you don't clean your colon, you will never get well!
    The intestines can store a large amount of waste in the form of partially digested, purifying matter. When we don’t eliminate this waste at least once but preferably 2 or 3 times a day, toxins from the feces are REABSORBED back into the bloodstream. This leads to damaging effects on the skin as well as the entire body.

    As waste sits in the colon, substances can become stuck or lodged in the lining of the intestinal tract in the form of old fecal matter and mucus. It can turn into a substance called “Mucoid Plaque”. It consists of food residue and mucosa (a lubricate, gel-like secrete produced by the glands in the alimentary tract). It builds up slowly over years without showing any signs of serious problems. Many of us have excess mucus stuck in our bowel and do not know it. Once this plaque is created, it is not routinely eliminated. It actually stay stuck to the intestinal wall for years. To make things worse, old feces can adhere to the plaque and may not be removed during elimination. This plaque can slow down bowel action and slowing waste elimination which, causes more toxins to be reabsorbed back into your system. This creates even more free radicals, inflammation, and inhibits nutrients from absorption. It can also harbor pathogens such as bacteria and parasites and block the release of lymph and mucus.

    The clean 9 detox will not only REMOVE TOXINS FROM YOUR BODY but it will also IMPROVE digestion and elimination, prevent chronic diseases, enhance immune system function, improve quality of life, increase energy, improve skin quality, mental/emotional clarity and slow down the aging process. Suggested time for this cleanse is 9 days. You will be able to eat on this cleanse, but you will be restricted to certain foods.