Choking in Infants - First Aid Guide

(Under 1 Year)


An infant may readily choke on food or on very small objects in the mouth. The infant will rapidly become distressed, and you need to act quickly to clear any obstruction. If the infant becomes unconscious, be prepared to give rescue breaths and chest compressions. If an unconscious infant, the throat muscles may relax, leaving the airway sufficiently open for rescue breathing. If rescue breaths fail, chest compressions may clear the obstruction.

Recognition
  • Ask the infant if he is choking.
  • For mild obstruction, infant able to cough, but difficulty crying or making any other noise.
  • Photo Courtesy of Google
  • For severe or complete obstruction, unable to make any noise or breathe, with eventual loss of consciousness.

Priorities
  • To remove the obstruction.
  • To arrange urgent removal to hospital if necessary.

Steps in administering aid
  • If an infant is distressed, is unable to cry, cough, or breathe, lay him face down along your forearm, with his head low and support his chest and head. Give up to five back blows with the heel of your hand.
  • If back blows fail to clear the obstruction, turn the infant on to his back and give up to five chest thrusts. Using two fingers, push inwards and upwards (towards the head) against the infant’s breastbone, one finger’s breadth below the nipple line.
  • Perform five chest thrusts. The aim is to relieve the obstruction with each chest thrust rather than necessary doing all five. Check the mouth.
  • Photo Courtesy of Google 
  • If the obstruction is not cleared, repeat the above steps three times. If the obstruction is not cleared, take the infant with you to ambulance/medical aid. Continue until help arrives or the infant becomes unconscious.

Choking in a child - First Aid Guide

Young children are especially prone to choking. A child may choke on food or may put small objects into his mouth and cause a blockage of the airway. If a child is choking you need to act quickly. If he loses consciousness, be prepared to begin rescue breaths and chest compressions. The throat muscles may relax, leaving the airway sufficiently open for rescue breathing.

Recognition
  • Ask the child if he is choking.
  • For mild obstruction, the child may be able to speak, cough and breathe.
  • For severe or complete obstruction, the child may be unable to speak, cough or breathe and may eventually lose consciousness.

Priorities
  • To remove the obstruction.
  • To arrange urgent transfer to hospital if necessary.

Steps in administering aid
  • If the child is coughing, encourage him to continue coughing. Remove any obvious obstruction from the mouth.
  • If the child cannot speak or stops coughing or breathing, perform abdominal thrusts. Kneel behind the child and put both arms around the upper part of his abdomen. Make sure he is still bending well forwards. Clench your fist and place it between the navel and the bottom of the breast bone. Grasp your fist with your other hand. Pull sharply inwards and upwards up to five times.
  • Check his mouth. If the obstruction is still not cleared, repeat step 2 three times, checking the mouth after each step.
  • If the obstruction still has not cleared, call for medical assistance. Continue until help arrives or casualty gets better. 

Drowning and near drowning - First Aid Guide

Death by drowning occur when air cannot get into the lungs, usually because a small amount of water has entered the lungs. This may cause spasms of the throat and suffocation.

Priority
  • To restore adequate breathing.
  • To keep the casualty warm.
  • Urgent transfer to hospital.

Steps in administering aid
  • Rescue from water and keep the head lower than the body. When a drowning person is rescued, water may gush from the mouth. This water is from the stomach and should be left to drain on its own accord. Do not attempt to force water from the stomach because the casualty may vomit and then inhale it.
  • Conduct lifesaving procedures, if unconscious. Once he is conscious place in recovery position.
  • Treat for hypothermia. Remove wet clothing if possible and cover him with dry blankets.
  • Monitor vital signs as you wait for an ambulance.
  • A casualty from drowning incident must receive medical attention. 

PENETRATING CHEST WOUND - First Aid Guide

The heart, lungs and the major blood vessels which lie within the chest (thorax) are protected by the breasts bone and the 12 pairs of ribs that make up the ribcage. The ribcage extends far much downwards to protect organs such as the liver and spleen in the upper part of the abdomen. If a sharp object penetrates the chest wall, there may be severe internal damage within the chest and upper abdomen.

One type of such injury is the sucking chest wound, in which air enters the chest cavity causing the collapse of the lung on the affected side. This causes difficulty in breathing and may lead to hypoxia and death.

Recognition
  • Difficult, painful, rapid, shallow and uneven breathing.
  • Casualty feels an acute sense of alarm.
  • Coughing frothy, red blood.
  • A cracking feelings of the skin around the site.
  • Blood bubbling out of the skin around the site.
  • Blood bubbling out of the wound.
  • Bubbling sound out of the wound (Sucking sound)
  • Distended neck veins.
  • Features of hypoxia.
Priority
  • To seal the wound and maintain breathing.
  • To minimize shock.
  • To arrange urgent transfer to hospital.
Steps in administering aid.
  • Put on gloves and encourage the casualty to lean towards the side of the injury and use the palm of his arm to cover the wound.
  • Place sterile dressing or non-fluffy clean pad over the wound and surrounding area. Cover with a plastic bag, foil or kitchen film and secure firmly with adhesive tape on three edges, or with bandages around the chest, so that the dressing is taut.
  • Call for an ambulance. While waiting for help continue to support the casualty in the semi sitting position leaning on the injured side as long as he remains conscious.
  • Monitor vital signs.

Hanging and strangulation - First Aid Guide

When pressure is exerted on the outside of the neck, the airway is squeezed and the flow of air to the lungs is cut off.

The main causes of such pressure are:
  • Hanging - suspension of the body by a noose around the neck.
  • Strangulation - constriction or squeezing around the neck or the throat.
  • Hanging may cause a broken neck for this reason casualty in this situation must be handled extremely carefully.

Recognition
  • A constricting article around the neck.
  • Marks around the casualty’s neck.
  • Rapid, difficult breathing, impaired consciousness, cyanosis.

Priorities
  • To restore adequate breathing.
  • To arrange urgent transfer to hospital.

Steps in administering aid
  • Quickly remove any constriction from around the casualty’s neck. Support the body while you do so if it still hanging. Be aware that the body may be very heavy.
  • Lay the casualty on the ground. Open the airway and check breathing. If he is not breathing, be prepared to give chest compression and rescue breaths if necessary. If he is breathing place in recovery position.
  • Call for medical aid or ambulance even if he appears to recover fully.

Hyperventilation - first aid guide

This is a manifestation of acute anxiety which may accompany a panic attack. It may occur in susceptible individuals who have recently experienced an emotional or psychological shock.

Recognition
  • Unnaturally fast, deep breathing.
  • Attention seeking behavior.
  • Dizziness of faintness.
  • Trembling or marked tingling in the hands.
  • Cramps in the hands and feet.

Priority
  • To remove the casualty from the cause of distress.
  • To reassure the casualty and calm her down.

Steps in administering aid
  • Reassure the casualty.
  • Lead the casualty to a quiet place.
  • Tell the casualty to breathe and exhale in a paper bag.
  • Encourage the casualty to see the doctor.


Croup - First Aid Guide

This is an inflammation of the wind pipe and larynx that leads to very severe breathing difficulty in very young children. Croup can be alarming but usually passes without leaving permanent damage. Attacks of croup usually occur at night and may recur before the child settles.

Recognition
  • Distressed breathing in a young child.
  • A short barking cough.
  • A crowing or whistling noise.
  • Cyanosis.
  • Respiratory distress.
  • High temperature.

Priority
  • To comfort and support the child.
  • To obtain medical help if necessary.

Steps in administering aid for croup

  • Sit the baby upright.
  • Streaming of the child is recommended,
  • CALL FOR AN AMBULANCE if severe.

ASTHMA - First Aid Guide

An asthmatic attack is caused by spasms or narrowing of the bronchioles (air passages) in the lungs. This leads to swelling of the linings of the airways, further constricting the alveoli causing airway obstruction.

ASTHMA: Recognition

  • Difficulty in breathing.
  • Wheezing.
  • Difficult in speaking.
  • Distress and anxiety.
  • Cough.
  • Hypoxia.

ASTHMA: Priority

  • To ease breathing.
  • To obtain medical help if necessary.

ASTHMA: Steps in administering aid.

  • Calm the patient.
  • Allow to sit in a comfortable position.
  • If the attack persists call for assistance.
  • If patient has an inhaler prescribed to them by a doctor, assist them in taking the recommended dose.

First Aid Guide - Choking in Adults.

A foreign object that is stuck at the back of the throat may block the throat or cause muscular spasm. If the blockage of the airway is mild, the casualty should be able to clear it, if it is severe, he will eventually lose consciousness. Be prepared to begin rescue breaths and chest compressions. The throat muscles may relax, leaving the airway sufficiently open for rescue breathing.

Recognition
  • Ask the casualty if he is choking.
  • For mild obstruction, the casualty may be able to speak, cough and breathe.
  • For severe or complete obstruction, the casualty is unable to speak, cough and breathe and may eventually lose consciousness.
Priorities
  • To remove the obstruction.
  • To arrange urgent transfer to hospital if necessary.

Steps in administering aid.

  • If the casualty is coughing, encourage him to continue coughing. Remove any obvious obstruction from the mouth.
  • If the casualty cannot speak or stops coughing or breathing, perform abdominal thrusts. Stand behind the casualty and put both arms around the upper part of his abdomen. Make sure he is still bending well forwards. Clench your fist and place it between the navel and the bottom of the breast bone. Grasp your fist with your other hand. Pull sharply inwards and upwards up to five times.
  • Check his mouth. If the obstruction is still not cleared, repeat step 2 three times, checking the mouth after each step.
  • If the obstruction still has not cleared, call for medical assistance. Continue until help arrives or casualty gets better. 
See video

Airway Obstruction - First Aid Guide

The airway may be obstructed internally or externally. The main causes of airway obstruction include:
  • Inhalation of foreign object such as food or false tooth - choking.
  • Blockage from blood or vomit. Internal swelling of the throat occasioned by burns, scalds, stings or anaphylaxis (allergies)
  • Injuries to the face or jaw.
  • Asthma
  • External pressure on the neck, as in hanging or strangulation.

Recognition
  • Difficulty breathing and speaking.
  • Noisy breathing.
  • Red, puffy face.
  • Signs of distress from the casualty who may point to the throat or grasp the neck.
  • Flaring of the nostrils.
  • A persistent dry cough.

Priorities
  • To remove the obstruction.
  • To restore normal breathing.
  • To arrange transport to hospital.

Steps in administering aid

  • Remove the obstruction if it is external or visible in the mouth.
  • If the casualty is conscious and breathing normally, reassure her, but keep her under observation. Monitor and record vital signs.
  • If the casualty is unconscious, open the airway and check for breathing, be prepared to give chest compressions and rescues breaths if necessary.
  • If the casualty appears to have made a complete recovery, call a doctor or take or send the casualty to hospital.

Shock--first aid guide

This is a condition that occurs as a result of failure of the circulatory system to supply oxygen to the vital body organs. A key cause is bleeding.

Recognition
  • Rapid, weak pulse.
  • Pale, cold, clammy skin.
  • Sweating.
  • Weakness and dizziness.
  • Nausea and vomiting.
  • Feeling thirsty.
  • Rapid shallow breathing.
  • Restlessness, yawning, gasping for air.
  • Cyanosis.
  • Unconsciousness.

Priorities
  • To recognize shock.
  • To improve the blood supply to the brain heart and lungs.
  • To arrange transfer to hospital.

Do not let the casualty eat, drink, smoke or move unnecessarily, If he complains of thirst, moisten his lips with little water.
Do not leave the casualty unattended except to call an ambulance.
Do not try to warm the casualty with a hot water bottle or any other direct source of heat.

Steps in administering aid.
  • Treat for any cause of shock that you can identify. For example severe bleeding or serious burns.
  • Lay casualty down and cover with a blanket to insulate him from the cold ground.
  • Keep warm and reassure.
  • Raise and support legs if there are no visible injuries to the trunk. Take care if you suspect fracture.
  • Loosen tight clothing at the neck, chest, and waist to reduce constriction in these areas.
  • Call for ambulance.
  • Monitor vital signs. 

Heart Attack--First aid guide

Heart attack is caused by sudden obstruction of the blood supply to part of the heart.

Recognition
  • Persistent central chest pain that spread to the left arm and jaw.
  • Sudden faintness and dizziness.
  • Rapid weak, irregular pulse.
  • Profuse sweating.
  • Extreme gasping for air.
  • Sudden collapse.
Priority
  • To encourage the casualty to rest.
  • Help the casualty take his medication.
  • Arrange urgent transfer of the casualty to hospital.

Steps in administering aid
  • Encourage the casualty to rest.
  • Make the casualty as comfortable as possible to ease the strain on his heart. A half sitting position with the casualty’s head and shoulders well supported and his knees bent is often the best.
  • Call for assistance (ambulance). State that you suspect heart attack. If the casualty ask you to do so, call his own doctor. If the casualty is fully conscious, give him full dose (300mg) aspirin tablets and advise him to chew it slowly.
  • If the casualty has medicine for angina such as tablets or aerosol spray help him to take it.
  • Constantly monitor and record vital signs.
  • If the casualty is UNCONSCIOUS, follow the safety, Response, Airway, Breathing, Circulation steps. Clear the airway and check that breathing is present. If breathing stops, commerce resuscitation immediately. Always send for an ambulance or transport the casualty promptly because a heart attack needs special treatment in hospital. 

Fainting--First aid guide

A faint is a brief loss of conscious caused by temporary reduction of blood flow to the brain.
Fainting may be a reaction to pain, exhaustion, and lack of food or emotional stress.

Recognition
  • Sudden dizziness.
  • Rapid pulse.
  • Pale cold skin.
  • Sweating.
  • Sudden collapse.

Priorities
  • To improve blood flow to the brain.
  • To reassure the casualty as he recovers and make him comfortable.

Steps in administering aid for fainting

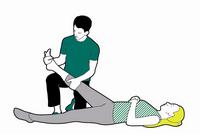
  • When a casualty feels faints, advise him to lie down. Kneel down, raise his legs and support the ankles on your shoulders; this helps to improve the blood flow to the brain.
  • Make sure that the casualty has plenty of fresh air. Ask someone to open a window. In addition ask any bystander to stay clear.
  • As he recovers, reassure him and help him to sit up gradually. If he starts to feel faint again advise him to lie down again and raise and support his legs until he recovers fully.

Angina Pectoris-First aid guide

The term Angina Pectoris refers chest pain that is cardiac in origin due to reduced blood supply to the heart muscle. Angina occurs when coronary vessels that supply the heart muscles with blood become narrowed and cannot carry sufficient blood during exercise and excitement.

Recognition
  • Pain easing with rest.
  • Shortness of breath.
  • Central chest pain spreading to the jaw.
  • Feeling of anxiety.
Priorities
  • Ensure casualty rests to ease strain to heart.
  • Help the casualty take any medication prescribed to them by a doctor as directed.
  • Obtain medical help.

Steps in administering aid.

  • Help the casualty to stop activity, keep bystanders away and reassure him.
  • Help the casualty to take anti Angina medication e.g. aerosol spray or tablets.
  • If the pain subsides, the casualty will resume his activities.
  • Ask him to seek medical advice.
  • If the pain persists, or returns, suspect a heart attack and call an ambulance.

Vaginal bleeding--first aid guide

Any visible bleeding in a woman who is at full term (heavily expectant) should be considered a true emergency and prompt action should be initiated!!!!

Priority
  • Make the woman comfortable.
  • Observe her and treat for shock.
  • Arrange for urgent transfer to hospital.

Steps in administering aid

  • Put on disposable gloves.
  • Remove the woman if possible to a place with some privacy. Otherwise arrange for screening to be set up around her.
  • Find a sanitary pad or clean towel and give her to use.
  • Make the casualty as comfortable as possible, in whichever position she prefers. If she chooses to sit up, prop her up with rolled up clothing or cushions.
  • If the casualty knows that her cramps are due to a menstrual period she may take painkillers or her own medication.
If the woman has been sexually assaulted, it is vital to preserve the evidence as much as possible.

Abdominal wounds--first aid guide

Priorities
  • Minimize shock.
  • Minimize the risk of infection.
  • Arrange urgent transfer to hospital.

Steps in administering aid

  • Put on disposable gloves.
  • Help the casualty to lie down on a firm surface preferably on a blanket.
  • Loosen any tight clothing, such as a belt or a shirt.
  • Put a dressing over the wound and secure it in place with a bandage or adhesive tape.
  • If blood seeps through the dressing, apply another dressing or pad on top.
  • Do not touch any protruding intestines instead, cover the area with a clean plastic bag or kitchen film to prevent the intestines surface from drying out. Alternatively, apply a sterile dressing.
  • Treat the casualty for shock.
  • Monitor and record vital signs.
  • Call for an ambulance.
If a casualty with an open wound coughs or vomits, press firmly on the dressing to prevent the content of the abdomen from pushing through the wound and being exposed. 

Bleeding varicose veins--first aid guide

Priorities
  • To control bleeding.
  • To minimize shock.
  • To arrange urgent transfer to hospital.
Steps in administering aid
  • Put on disposable gloves.
  • Help casualty to lie on the back.
  • Raise the injured leg as high as possible to reduce the amount of bleeding.
  • Rest the injured leg on your shoulder or chair. Apply firm, direct pressure on the injury, using a sterile dressing, or a clean, non-fluffy pad, until the bleeding stops.
  • Remove garments such as elastic topped stockings because this may cause bleeding to continue.
  • Keeping the leg raised, put another large, soft pad over the dressing and bandage it firmly to exert pressure.
  • Call for help.
  • Continue monitoring vital signs and level of consciousness until help arrives.

Wound at a joint crease--first aid guide

Priorities
  • Control bleeding.
  • Prevent and minimize the effect of shock.
  • Transfer to hospital.

Steps in administering aid
  • Put on disposable gloves.
  • Press a sterile dressing or clean, non-fluffy pad on the injury.
  • Bend the joint firmly to hold the pad in place and keep pressure on the wound.
  • Raise and support the limb.
  • If possible help the casualty to lie down with his legs raised and supported.
  • Take or send the casualty to hospital in the final treatment position. Every 10 minutes, check the circulation beyond the injury. If necessary, briefly release the pressure on the wound to restore normal blood flow to the lower part of the limb, and then reapply pressure. 

Wounds to the palm and wrist--first aid guide

Priorities
  • Control bleeding and the effect of shock.
  • Prevent infection.
  • Arrange transport to hospital.
Steps in administering aid
  • Put on disposable gloves.
  • Press a sterile dressing or clean pad firmly into the palm and ask the casualty to clench his fist over it. If he finds it difficult to press hard, tell him to grasp his fist with his uninjured hand.
  • Bandage the casualty’s fingers so that they are clenched over the pad.
  • Tie the ends of the bandage over the top of the fingers.
  • Support the casualty’s arm in an elevation sling, to keep it raised.
  • Transfer to hospital.

Knocked out tooth--first aid guide

Priority
  • To replant the tooth as soon as possible.
Steps in administering aid
  • Put on disposable gloves.
  • Gently push the tooth into the socket. Keep it in place by pressing a gauze pad between the bottom and the teeth.
  • Ask the casualty to hold the tooth firmly in place.
  • Send him/her to dentist or hospital.

Bleeding from the mouth--first aid guide

Priority
  • To control bleeding.
  • To safeguard the airway.

Steps in administering aid
  • Put on disposable gloves.
  • Ask the casualty to sit down, with his head forward and tilted slightly to the injured side, to allow blood to drain from the mouth.
  • Place a gauze pad over the wound.
  • Ask the casualty to squeeze the pad between finger and thumb and press on the wound for 10 minutes.
  • If bleeding persists, replace the pad.
  • Tell the casualty to let blood dribble out.
  • If swallow, it may induce vomiting. Advise him to avoid drinking anything hot for 12 hours.
To control bleeding from a tooth socket, take a gauze pad that is thick enough to stop the casualty's teeth meeting, place it across the empty socket and tell him to bite down on it. If the wound is large or if bleeding persist beyond 30 minutes or recurs, seek medical or dental advice. Do not wash the mouth out because this may provoke more bleeding.

Nose bleeding--first aid guide

Priorities
  • To control bleeding.
  • Maintain an open airway.

Steps in administering aid
  • Put on disposable gloves.
  • Ask the casualty to sit down.
  • Advise him to tilt his head forward to allow the blood to drain from the nostrils.
  • Do not let the head to tilt back; blood may run down the throat and induce vomiting.
  • Ask the casualty to breathe through his/her mouth (this will have a calming effect) and to pinch the soft part of the nose.
  • Reassure them.
  • Tell the casualty to keep pinching his/her nose.
  • Advise him/her not to speak, swallow, cough spit or sneeze because he may disturb blood clots that have formed in the nose.
  • Give him/her a clean cloth or tissue to mop up any dribbling.
  • After 10 minutes tell the casualty to release the pressure. If the bleeding has not stopped, tell him/her to reapply the pressure for two further periods of 10 minutes each.
  • Once the bleeding has stopped, any with the casualty still leaning forward clean around his/her nose with lukewarm water.
  • Advice the casualty to rest quietly for a few hours.
  • Tell him/her to avoid exertion and particularly not to blow the nose, because these actions will provoke more bleeding.
  • If bleeding stops and then restarts, tell the casualty to reapply pressure.
  • If the nose bleeding is severe, or if it lasts longer than 30 minutes in total, take or send the casualty to hospital in the treatment position. 

Bleeding from the ear--first aid guide

Priorities
  • Urgent transfer to hospital.
Steps in administering aid
  • Put on disposable gloves.
  • Help the casualty into a half sitting position, with his head tilted to the injured side to allow blood to drain away.
  • Hold a sterile dressing or clean, non-fluffy pad lightly in place on the ear.
  • Send or take the casualty to hospital in the treatment position.


Eye injuries--first aid guide

Priorities
  • Prevent further damage.
  • Arrange transport to hospital.
Steps in administering aid
  • Put on disposable gloves.
  • Help the casualty to lie on his back and hold his head to keep it as still as possible.
  • Tell him to keep both eyes still; movement of the “good” eye will cause movement of the injured one, which may damage it further.
  • Ask the casualty to hold a sterile dressing or a clean non fluffy pad over the affected eye.
  • If it takes some time to obtain medical help, secure the pad in place with a bandage.
  • Take or send the casualty to hospital in the treatment position.


Scalp and head wounds--first aid guide

Priority
  • To control bleeding.
  • To arrange transports to hospital.
Steps in administering aid
  • Put on disposable gloves.
  • If there are any displaced flaps of skin at the injury site, carefully replace them over the wound.
  • Reassure the casualty.
  • Cover the wound with a sterile dressing or a clear, non-fluffy pad.
  • Apply firm direct pressure on the pad. This measure will help to control bleeding and reduce blood loss, minimizing the risk of shock.
  • Secure the dressing with a roller bandage. (For minor bleeding, you can keep the pad in place with a triangular bandage).
  • Help the casualty to lie down, with their head and shoulders slightly raised.
  • Regularly monitor and record vital signs.
  • Then take or send the casualty to hospital in the final treatment position.

Bruising--first aid guide

This is caused by bleeding into the skin or into tissues beneath the skin. It can either develop rapidly or emerge a few days later.

Priority
  • Reduce blood flow to the area, thus minimizing swelling.
Steps in administering aid
  • Put on disposable gloves.
  • Raise and support the injured part.
  • Apply firm pressure to the wound using a cold compress.
  • Keep the compress for at least 5 minutes.

Minor cuts and grazes--first aid guide

Bleeding in cuts and grazes is easily controlled by pressure and elevation.

Priority
  • To minimize infection.

Steps in administering aid

  • Put on gloves.
  • Clean wound with clean water, pat dry and cover with sterile wound dressing.
  • Elevate the injured part above the level of the heart.
  • Clean surrounding area with soap and water.
  • Use clean swab for each stroke.
  • Pat dry.
  • Remove the wound covering and apply an adhesive dressing. If there is a special risk of infection, advice the casualty to see their doctor.
  • Call for help i.e. ambulance.

Crush injury--first aid guide

Traffic and building site incidents are the most common cause of crush injuries. Other possible causes include explosions, earthquake and train crashes. Crush injury may lead to internal bleeding, fracture and swelling.

Two scenarios
  • If crushed for less than 15 minutes.
  • If crushed for more than 15 minutes.

If crushed for less than 15 minutes

Priorities
  • To obtain specialist medical aid urgently taking any steps possible to treat the casualty.

Steps in administering aid
  • Put on gloves.
  • Release the casualty quickly.
  • Control external bleeding and cover any wounds.
  • Secure and support any suspected fractures.
  • Treat casualty for shock.
  • Call for an ambulance/assistance
  • Give all the details of the incident.
  • Monitor vital signs, until help arrives.

If crushed for more than 15 minutes
Do not remove crushing object from the casualty.

Prolonged crushing force damages muscle tissues and cells. These damaged tissues release harmful chemicals. If the crushing force is released suddenly and without proper treatment, these toxic substances are released into the rest of the body and can cause damage to vital organs and even death.

Priority
  • To obtain specialist medical aid urgently.

Steps in administering aid.
  • Call for help/assistance i.e. ambulance.
  • Comfort and reassure the casualty.
  • Monitor and record vital signs.

Amputation--first aid guide

This is when a limb has been partially or completely severed. In many cases the severed limb can be reattached by microsurgery.

Priorities
  • Minimize blood loss and shock.
  • Arrange urgent transfer to hospital.
  • Prevent deterioration of the amputated part.
  • Prevent infection.

Steps in administering aid

  • Put on gloves.
  • Control bleeding by applying direct pressure and raising the injured part.
  • Apply sterile dressings.
  • Call an ambulance.
  • Put the severed part in a plastic bag, wrap in a soft fabric and place it in cold water or crushed ice in a container.
  • Take the severed part together with casualty to the hospital.

Bleeding--first aid guide

This is loss of blood from the body as a result of blood vessels being torn or severed.

There are two main types of bleeding;

  1. External bleeding.
  2. Internal bleeding.

EXTERNAL BLEEDING
This is when you can obviously see blood.

If NO OBJECT is embedded in the wound.

Priorities

  • Control bleeding.
  • Prevent and minimize effects of shock.
  • Minimize infection.
  • Arrange for an urgent transfer to hospital.
Steps in administering aid
  • Put on gloves if available or improvise.
  • Remove or cut clothing as necessary to expose the wound.
  • Apply direct pressure over the wound with your fingers or palm, preferably over a sterile dressing or non-fluffy clean pad (but do not waste any time by looking for a dressing). You can ask the casualty to apply direct pressure himself.
  • Raise/support the injured limb above the level of the casualty’s heart to reduce blood loss. Handle the limb very gently if you suspect that there is a fracture.
  • Help the casualty to lie down on a blanket if available to protect him from the cold. If you suspect that shock may develop, raise and support his legs so that they are above the level of his heart.
  • Secure the dressing with a bandage that is tight enough to maintain pressure but not so tight that it impairs the circulation.
  • If further bleeding occurs apply a second dressing on top of the first. If the blood seeps through the second dressing, add another on top of it.
  • If bleeding continues hold firmly onto the pressure points as demonstrated above for a few minutes in order to slow down blood activity along the injury.
  • Comfort and reassure the casualty, this can help to slow down the heartbeat and reduce any further loss of blood.
If AN OBJECT is embedded in the wound.

Priorities

  • Control bleeding.
  • Prevent and minimize effects of shock.
  • Minimize infection.
  • Arrange for urgent transfer to hospital.
  • Foreign objects such as glass, metal or splinters may be present in a wound. If the object is sticking out of the skin and is clearly embedded do not remove it.
Steps in administering aid
  • Put on disposable gloves.
  • Press firmly on either side of the embedded object to push the edges of the wound together.
  • If the injury is to a casualty’s limb, raise and support the limb above the level of his heart to reduce the blood loss.
  • Help the casualty to lie down on a blanket, If available, to protect him from the cold if you suspect that shock may develop, raise and support his legs so that they are above the level of his heart.
  • Build up padding on either side of the object. Carefully bandage over the object without pressing on it.
  • Support the injured part in a raised position with a sling and or bandaging to minimize swelling.
  • Call for an ambulance.
  • Monitor and record vital signs. 

Wounds--First aid guide

A wound is a break or injury to the skin, which sometimes involves underlying soft tissues.
There are two categories of wounds; open and closed wounds. Open wounds bleed leading to loss of blood and fluids from the body and are a source of infection. Closed wounds bleed internally and may cause severe damage. There are different types of wounds. These include incisions, lacerations, abrasions, contusions (bruises) and punctures.

Priorities
  • Stop bleeding.
  • Prevent infection by covering.
Steps in administering aid
  • Stop any bleeding quickly.
  • Prevent infection from entering the body by using sterile or clean dressings whenever possible.
  • Wear disposable latex gloves when cleaning a wound or make sure any of your cuts are covered and wash your hands before and after cleaning wounds.
  • Clean minor cuts and grazes with cooled boiled water or antiseptic if available.
  • Apply a clean dressing.
  • Dispose used gloves and soiled dressing in a sealed container. These can be burned or deeply buried.
  • Seek the advice of a doctor because an anti-tetanus injection may be needed. A puncture wound, such as an injury from a rusty nail, or a bite from a cat or dog may become infected later.

Foot and toe injuries--first aid guide

Injuries affecting the foot and toes.

Recognition
  • Difficulty in walking.
  • Stiffness on movement.
  • Bruising and swelling.

Priorities
  • Minimize swelling.
  • Transfer to hospital.

Steps in administering aid.

  • Put on gloves.
  • Quickly raise and support the foot. This reduces blood flow to the area minimizing swelling.
  • Apply an ice pack or cold compress. This relieves swelling.
  • Arrange to take the casualty to hospital. If he/she is not being transported by an ambulance, try to ensure that the foot remains elevated during travel.

Ankle Injury--First aid guide

Involves sprain, strain or dislocation of the ankle. If fractured, treat as a lower leg fracture.
Ankle Injury

Recognition
  • Pain worsened on movement or by putting weight on the foot.
  • Swelling.
Priorities
  • Relieve pain and swelling.
  • Seek medical aid.

Steps in administering aid.

  • Put on gloves
  • Rest, steady and support the ankle in the most comfortable position.
  • If the injury has occurred recently, apply ice pack or a cold compress to the site to reduce pain.
  • Wrap the ankle in think padding and bandage family.
  • Raise and support the injured limb.
  • Advise the casualty to rest ankle.
  • Transfer to hospital.

Lower leg injury--first aid guide

Fractures of the shin bone, the splint bone and tearing of the soft tissues.

Recognition
  • Localized pain.
  • Swelling, bruising and deformity of the leg.
  • An open wound.
Priorities
  • Immobilize the leg.
  • Urgent transfer to hospital.

Steps in administering aid

  • Put on gloves.
  • Help the casualty to lie down and carefully steady and support the injured leg.
  • If there is an open wound, gently expose it and treat bleeding.
  • Apply padding to protect the wound.
  • Call for help.
  • Support the injured leg with your hands to prevent any further movement of the fracture site.
  • Do this until the ambulance arrives.
  • If the ambulance is delayed, support the injured leg by splinting it to the other leg. Bring the uninjured limb alongside the injured one and slide bandages under legs. Position bandages at the feet and ankles then the knees, add bandages above and below the fracture. Insert padding between the lower legs. Then tie the bandages firmly, knotting them on the uninjured side.
  • For suspected fracture near ankle; place separate bandages above the ankles and around the feet, rather than one figure of eight.

Knee injury--first aid guide

Injury to the knee joint.

Recognition
  • Pain spreading from the injury to become deep seated in the joint.
  • If the knee is locked, acute pain on straightening.
  • Rapid swelling around the knee joint.
Priorities
  • Knee protection.
  • Urgent transfer to hospital.

Steps in administering aid

  • Put on gloves.
  • Help the casualty to lie down, preferably on a blanket to insulate him from the ground.
  • Place soft padding such as a pillow, blanket or coat under the injured knee to support it in the most comfortable position.
  • Wrap soft padding around the joint.
  • Secure with bandages extending from mid-thigh to the middle of the lower leg.

Hip and thigh injuries--first aid guide

Fracture to the hip and thigh bones.

Recognition
  • Pain at the site of injury
  • Inability to walk.
  • Signs of shock.
  • Shortening of the leg.
Priorities
  • Immobilize the lower limb.
  • Urgent transfer to hospital.
Steps in administering aid
  • Put on gloves.
  • Help the casualty to lie down.
  • If possible, ask a helper to gently steady and support the injured limb.
  • Gently straighten the casualty’s lower leg. If necessary, apply traction at the ankle to help straighten the leg.
  • Call for help.
  • If ambulance is expected to arrive soon, keep the leg supported in the same position until the ambulance arrives.
  • If the ambulance is not expected to arrive soon, immobilize the leg by splinting it to the uninjured one.
  • Gently bring the uninjured limb alongside the injured one.
  • Position bandages at the ankles and feet, then the knees, add bandages above and below the fracture site.
  • Insert soft padding between the legs to prevent the bony parts from rubbing against each other, then tie the bandages on the uninjured side.

Fractured Pelvis--first aid guide

These are injuries to the pelvis.

Recognition
  • Inability to walk or even stand, although the legs may appear uninjured.
  • Pain and tenderness around the hip, groin or back that increases with movement.
  • Bloody urine.
  • Inability to pass urine or find it painful to pass urine.
  • Signs of shock or internal bleeding.
Priorities
  • Minimize risk of shock.
  • Urgent transfer to hospital.

Steps in administering aid

  • Put on gloves.
  • Help the casualty to lie down on his back.
  • Keep his legs straight and flat or, if it is more comfortable, help him to bend his knees slightly and support them with padding such as a cushion or folded clothing.
  • Place padding between the bony points of the knees and the ankles.
  • Immobilize the legs by bandaging them together with folded triangular bandages to secure the feet and ankles.
  • Call for help.
  • Treat the casualty for shock.
  • Monitor and record vital signs - level of response, breathing and pulse until help arrives.

Back pain--first aid guide

Pain in the spine or in the ligaments and muscles around it.

Recognition
  • Dull to severe pain in the back or neck increased by movement.
  • Pain traveling down any of the limbs, possibly together with tingling and numbness.
  • Spasms of the muscles causing the neck or back to be held rigid or bent.
  • Tenderness in the muscles.
Priorities
  • To relieve pain.
  • Obtain medical aid.

Steps in administering aid.

  • Put on gloves.
  • Advice the casualty to lie down flat in the most comfortable position for him/her and stay still until the pain eases, either on the ground or on a firm mattress.
  • Assist the casualty to take his/her own painkillers, if necessary.
  • If the symptoms persist, call his/her doctor or send him/her to hospital.
See also for Backache

Spinal Injury--first aid guide

These are injuries to the spine.

Recognition
  • Pain in the neck or back at the injury site.
  • Irregularity in the normal curve of the spine.
  • Tenderness at the injury site.
  • Loss of control of limbs, movement; may be weak or absent.
  • Loss of sensation.
  • Loss of bladder and or bowel control.
  • Breathing difficulty.
Priorities (conscious casualty)
  • Prevent further injury.
  • Urgent transfer to hospital.
Priorities (unconscious casualty)
  • Maintain an open airway.
  • Resuscitate the casualty if necessary.
  • Prevent further damage.
  • Urgent transfer to hospital.
Steps in administering aid
  • Put on gloves.
  • Reassure the casualty if conscious.
  • Place the head in a neutral in-line position.
  • Open the airway using jaw thrust maneuver.
  • Place the casualty on the spine board and transport to hospital. 

Injury to the rib cage/penetrating chest wounds/sucking chest wounds--First aid guide

This involves fracture to the ribs.

Recognition
  • Sharp pain at the site of injury.
  • Pain on taking a deep breath.
  • Shallow breathing.
  • An open wound over the fracture.
  • Paradoxical (unequal) breathing.
Priorities
  • To support breathing.
  • Transfer the casualty to hospital.

Steps in administering aid.
  • Put on gloves.
  • For fractured ribs, support the arm on the injured side with an elevation sling and transfer the casualty to hospital.
  • If there is a penetrating chest wound, lean the casualty towards the affected side and cover and seal the wound along three edges.
  • Help the casualty to settle into the most comfortable position inclined towards the injured side.
  • Support the arm on that side with an elevation sling.
  • Transfer the casualty to hospital. 

Hand and finger injuries--Aid guide

This is injuries to the bones of the fingers and the hand.

Recognition
  • Pain worsened by movement.
  • Swelling, bruising and deformity.
  • Open fracture, a wound and bleeding.
Priorities
  • To immobilize.
  • Elevate the hand.
  • Transfer to hospital.
Steps in administering aid
  • Put on gloves.
  • Apply a clean non fluffy dressing to the wound.
  • Remove any rings before the hand begins to swell, and keep the hand raised to reduce swelling.
  • Protect the injured area by wrapping the hand in fold of soft padding.
  • Gently support the affected arm across the casualty’s body by applying an elevation sling.
  • If necessary secure the arm to the casualty’s body by tying a broad fold bandage around the chest and over the sling.
  • Transfer the casualty to hospital.

Forearm and wrist injuries--first aid guide

This is an injury to the bones of the arm (ulna and radius).

Recognition
  • Pain, worsened by movement.
  • Swelling, bruising and deformity.
  • Open fracture, a wound and bleeding.
Priorities
  • To immobilize the arm.
  • Transfer to hospital.

Steps in administering aid

  • Put on gloves.
  • Ask the casualty to sit down.
  • Gently steady and support the injured forearm by placing it across his body.
  • Expose and treat any wound that you find.
  • Place a triangular bandage between the chest and the injured arm, as for an arm sling.
  • Surround the forearm in soft padding, such as a small towel or a thick layer of cotton wool.
  • Fasten the arm sling around the arm and its padding using a reef knot. Tie knot at the hollow of the casualty’s collar bone on the injured side.
  • If the journey to hospital is likely to be prolonged, secure the arm to the body by trying a broad fold bandage over the sling.
  • Position the bandage close to the elbow.
  • Transfer the casualty to the hospital.

Elbow injury--First aid guide

These are fractures or dislocation at the elbow.

Recognition
  • Pain worsened by movement.
  • Tenderness over the site of a fracture.
  • Swelling, bruising and deformity.
  • Fixed elbow.

Priorities
  • Immobilize the arm.
  • Prevent further injury to the joint.
  • Transfer to hospital.

Elbow injury: Steps in administering aid

  • Put on gloves.
  • For an elbow that can bend, treat it as an upper arm injury.
  • For an elbow that cannot bend, help the casualty to lie down.
  • Place padding, such as cushions or towels around the elbow for comfort and support.
  • Do not try to move the injured arm or apply bandages if help is coming.
  • When preparing for transport, put padding between the injured limb and body.
  • Then use three folded triangular bandages to immobilize the injured limb against the trunk, at the wrist and hips then above and below the elbow.
  • Call for an ambulance.
  • Check the pulse in the injured arm regularly until medical helps arrives.

Upper arm injury--first aid guide

This involves fracture of the humerus (the long bone in the upper arm).

arm sling
Recognition
  • Pain worsened by movement.
  • Tenderness and deformity over the site of fracture.
  • Rapid swelling.
  • Bruising which may develop more slowly.
Priority
  • Immobilize the arm.
  • Transfer to hospital.

Steps in administering aid

  • Ask the casualty to sit down.
  • Gently place the forearm horizontally across his body in the most comfortable position.
  • Ask him/her to support the elbow if possible.
  • Place soft padding beneath the injured arm. Then tie the arm and its padding with an arm sling to support it.
  • Secure the arm by trying a broad fold bandage around the chest and over the sling.
  • Try to avoid bandaging over the fracture site if possible.
  • Transfer the casualty to hospital.

Shoulder injury--first aid guide

This is a dislocation or a closed fracture of the shoulder.

Recognition
  • Pain and tenderness increased by movement.
  • Flat angular look to the shoulder.
  • Attempts by casualty to relax the muscles.
Priorities
  • To support and immobilize the injured limb.
  • To arrange transport to hospital.
Steps in administering aid
  • Put on gloves.
  • Help the casualty to sit down. Gently place the arm on the affected side across her body in the position that is comfortable.
  • Place a triangular bandage between the arm and the chest in preparation for trying an arm sling.
  • Insert soft padding such as a folded towel or clothing, between the arm and the chest inside the bandage.
  • Finish tying the arm sling so that the arm and its padding are well supported.
  • Secure the limb to the chest by tying a broad fold bandage around the chest and over the sling.
  • Arrange to take or send the casualty to hospital in sitting position.

Fractured collar bone--First Aid Guide

This involves fracture of the clavicle; the bone that forms the structure between the shoulder blade and the top of the breast bone to help support the arms.
Elevation sling.

Recognition
  • Pain and tenderness on movement.
  • Swelling and deformity of the shoulder.
  • Attempts by casualty to relax the muscles.


Priorities
  • To immobilize the injured shoulder and arm.
  • Transfer casualty to hospital.
Steps in administering aid
  • Put on gloves.
  • Help the casualty to sit down.
  • Lay the affected arm diagonally across her chest with the fingertips resting against the opposite shoulder.
  • Ask him to support the elbow with his/her other hand.
  • Gently replace some soft padding, such as a small towel or folded clothing, between the arm and the body to make the casualty more comfortable.
  • Secure the arm to the chest with a broad fold bandage, tied around the chest and over the sling.
  • Transfer the casualty to hospital in a sitting position.

Jaw Fracture--First Aid Guide

This is fracture of the jaw bones.

Recognition
  • Difficulty in speaking, swallowing and moving the jaw.
  • Pain and nausea when moving the jaw.
  • Displaced or loose teeth.
  • Dribbling of saliva.
  • Swelling and bruising inside and outside the mouth.
Priorities
  • To protect the airway.
  • Transfer casualty to the hospital.

Steps in administering aid

  • Put on gloves.
  • If the casualty is not seriously injured, help him/her to sit with his/her head bent forward to allow fluids to drain from his/her mouth.
  • Encourage the casualty to spit out any loose teeth and take them with him to the hospital.
  • Give the casualty a soft pad to hold firmly against his jaw in order to support it.
  • Transfer the casualty to hospital keeping his/her jaw well supported.

Cheekbone and nasal bone fractures--First Aid Guide

These are fractures on the cheekbone and the nose.

Recognition
  • Pain, swelling and bruising of affected area.
  • A wound or bleeding from the nose or mouth.
Priorities
  • To minimize pain and swelling.
  • Arrange transfer to hospital.
Steps in administering aid
  • Gently apply a cold compress to the injured area to help reduce pain and limit potential swelling.
  • If the casualty has nose bleeding, try to stop the bleeding.
  • Arrange to transport to hospital.

Facial fracture--First Aid Guide

This is a fracture of the facial bones.

Recognition
  • Pain around the area.
  • If at the jaw, difficulty in speaking, swallowing and chewing.
  • Difficulty in breathing.
  • Swelling and distortion of the face.
  • Bruising and or a black eye.
Priority
  • To keep the airway open.
  • To minimize pain and swelling.
  • Urgent transfer to hospital.
Steps in administering aid
  • Call for an ambulance.
  • Put on gloves.
  • If the casualty is conscious, get him to spit out any blood, displaced teeth or dentures from his mouth.
  • Gently apply a cold compress to the casualty’s face to help reduce pain and limit potential swelling.
  • Treat for shock.
  • Regular, monitors and record vital signs.
  • Transfer to hospital.

Joint dislocations--First Aid Guide

This is an injury in which the bones forming a joint are partially or completely pulled out of position. Following a sudden, unnatural movement, bones within a joint may become dislocated. Severe pain and swelling are common with loss of power or function of the injured area. In addition, there may be a fracture in, or around, the joint. Therefore, never attempt to correct the dislocation yourself.

Recognition
  • Severe pain and difficulty in moving the area.
  • Swelling and bruising around the joint.
  • Shortening, bending or twisting of the area.
Priorities
  • To minimize movement at the injury site.
  • To arrange transport to hospital.
Steps in administering aid
  • Put on gloves.
  • Place the casualty in the most comfortable position.
  • Apply a cold compressor e.g. ice pack.
  • Advise the casualty to keep still.
  • Support the injured part in a position of maximum comfort for the casualty before you immobilize it.
  • Immobilize the injured part with padding, bandages, and slings. For firm support, bandage the injured part to an affected part of the body.
  • Treat for shock of necessary.
  • Monitor and record vital signs.
  • Check the circulation beyond the bandages after every 10 minutes.
  • Seek urgent medical aid.


Sprains and strains--First Aid Guide

When ligaments around a joint are overstretched or torn, the injury is called a sprain. The injured joint becomes swollen and painful and prompt treatment is required. A strain is caused by an overstretched muscle or tendon. Swelling may or may not occur, but the casualty may complain of pain and loss of power in the injured area.

Recognition
  • Pain and tenderness around the joint.
  • Difficulty in moving the injured part.
  • Swelling and bruising at the area.
Priorities
  • To reduce the swelling and pain.
  • To obtain medical aid.
Steps in administering aid.
  • Place the casualty in the most comfortable position.
  • Apply a cold compress or an ice pack over the bandage for 15 minutes.
  • Apply a firm bandage to the affected area.
  • Elevate the injured part.


Fractures--First Aid Guide

A fracture is a break or crack in a bone caused by direct force, indirect force, or a twisting force.

Open and closed.
Open fracture has one broken bone end piercing the skin and protruding out. An open fracture carries a high risk of becoming infected. In closed fracture, the skin above the fracture is intact and there is a high risk of internal damage and bleeding.

Closed Fracture First Aid Guide

Closed fracture of the arm.

Priorities

  • To prevent movement at the fracture site.
  • To transfer to hospital.

Steps in administering aid

  • Put on disposable gloves.
  • Advice the casualty to keep still.
  • Support the injured part with your hands, or ask a helper to do this, until it is immobilized.
  • For firmer support, bandage the injured part to an unaffected part of the body. Make sure the bandage is tied on the uninjured side.
  • For the upper limb fractures immobilize the arm against the trunk.
  • For lower limb fractures, bandage the uninjured leg to the injured one if transfer to hospital is likely to be delayed.
  • Arrange to transport the casualty to the hospital.
  • Treat for shock if necessary.
  • Check the circulation beyond the bandage every 10 minutes. If the circulation is impaired, loosen bandages.

Open Fracture First Aid Guide


Open fracture of the leg.

Priorities

  • To prevent bleeding.
  • Minimize movement.
  • Prevent infection at the site of injury.
  • Transfer to hospital.

Steps in administering aid

  • Put on gloves.
  • Loosely cover the wound with a large clean non-fluffy pad or sterile dressing.
  • Apply pressure to control bleeding but do not press on the protruding bone.
  • Carefully place clean padding over and around the dressing.
  • Secure the dressing and padding with a bandage.
  • Bandage firmly but not tightly to impair circulation.
  • Using splints, immobilize the injured part as for a closed fracture and transport the casualty to hospital.
  • Treat for shock if necessary.
  • Monitor vital signs.

Seizures--First Aid Guide

Also called a fit/convulsion. It is an involuntary contraction of the muscles caused by disturbance in the electrical activity of the brain.

Recognition
  • Rigidity and arching of the back.
  • Convulsive movements.
  • Sudden unconsciousness.
Priorities
  • Safety of the casualty.
  • Maintain an open airway.
  • Transfer to hospital.
Steps in administering aid
  • Put on gloves.
  • If you see the casualty falling, try to ease his/her fall.
  • Make space around him/her; ask bystanders to move away.
  • Remove potentially dangerous items, such as hot drinks and sharp objects.
  • If possible protect the casualty’s head by placing soft padding underneath it.
  • Loosen clothing around his/her neck.
  • When the seizure has ceased, open the airway and check breathing. Be ready to give chest compressions and rescue breaths if necessary.
  • If he/she is breathing, place in recovery position.
  • Monitor vital signs until help arrives.

Stroke--First Aid Guide

This is a condition whereby blood supply to a part of the brain is suddenly impaired by a blood clot or a ruptured blood vessel.

Recognition
  • Slurred speech.
  • Difficult in swallowing.
  • Uneven facial movement.
  • Loss of power or movement in the limbs (unstable gait).
  • Sudden severe headache.
  • Confused mental state that could be mistaken for drunkenness.
  • Sudden or gradual loss of consciousness.
You will notice weakness on one side of the body, slurred speech and drooping of the face.

Priorities
  • Maintain an open airway.
  • Urgent transfer to hospital.
Steps in administering aid
  • Put on gloves.
  • If the casualty is conscious, help him to lie down with his head and shoulder slightly raised and supported.
  • Incline his head to the affected side and place a towel on his shoulder to absorb the dribbling saliva.
  • Call for help.
  • Loosen any clothing that might impair the casualty’s breathing.
  • Continue to reassure him/her.
  • Monitor vital signs until help arrives.

Injuries to the brain--First Aid Guide

Concussions

This is the shaking of the brain caused by a blow to the head.
The head strikes a hard creating a concussion-type of injury.

Recognition
  • Brief period of impaired consciousness.
  • Dizziness or nausea on recovery.
  • Loss of memory.
  • Mild generalized headache.

Priorities
  • Ensure safety of casualty.
  • Maintain an open airway.
  • Urgent transfer to hospital.

Steps in administering aid
  • Put on gloves.
  • Monitor and record vital signs.
  • Monitor level of consciousness.
  • When the casualty has recovered place him/her in the care of a responsible person.
  • If a casualty has been injured while playing, never allow him/her to go back to play before seeking medical advice.
  • Transfer to hospital.

Cerebral Compression--First Aid Guide

This occur when there is a buildup of pressure within the brain due to bleeding inside the skull.

Recognition

  • History of recent head injury.
  • Severe headache.
  • Slow, noisy breathing.
  • Low, yet full and strong pulse.
  • Unequal pupil size.
  • Weakness and or paralysis down one side of the face or body.
  • High temperature.
  • Flushed face.
  • Drowsiness.
  • Noticeable changes in behavior, such as irritability and disorientation.
  • Casualty may become unconscious.

Priorities

  • Urgent transfer to hospital.

Steps in administering aid

  • Put on gloves.
  • Call for help.
  • If the casualty is conscious, keep him supported in comfortable resting position and reassure him/her.
  • Maintain an open airway, check for breathing and be prepared to resuscitate.
  • Regularly monitor and record vital signs.


Head Injury--First Aid Guide

This is a serious condition in which the normal brain function is impaired due to injury to the head (skull). The impairment may be immediate or delayed.
Recognition
Bruising behind the ear
bruising around eyes
  • Wound or bruise on the head.
  • Soft area or depression on the scalp.
  • Bruising or swelling behind the ear.
  • Bruising around one or both eyes.
  • Clear fluid or waterly blood coming from the nose or an ear.
  • Blood stained eye.
  • Unequal size of the pupils.
  • Distortion or lack of symmetry of the head or face.
  • Progressive deterioration in the level of consciousness.
Priorities
  • Maintain an open airway.
  • Urgent transfer to hospital.
Steps in administering aid
  • Put on gloves.
  • If the casualty is conscious help him to lie down.
  • Do not turn the head.
  • Control bleeding from the scalp by applying pressure around the wound.
  • Look for and treat any other injuries.
  • Call for help.
  • If there is discharge from the ear, cover the area with a sterile dressing or clean pad, lightly secured with a bandage. Do not plug the ear.
  • Monitor and record vital signs until medical aid arrives.
  • If the position in which the casualty was found prevents maintenance of an open airway or you fail to open it using the jaw thrust, place him in the recovery position. If you have helpers use them to log-roll.