Yoga Posture Guide - The Accomplished or Adept Pose (Siddha-asana)

The Accomplished or Adept Pose (Siddha-asana) Translation

The Sanskrit word siddha means accomplished or adept, one who has attained the highest. The name implies the attainment of a perfectly stilled mind and the experience of peace that results from meditation. The siddha-asana is a recommended pose for meditation.

Pronunciation: sid-dhah-sa-na

Difficulty: (2)

Siddhasana or the accomplished pose is an asana used for meditation and other yogic practices. In Sanskrit ‘Siddha’ means ‘accomplished’ or an ‘adept’ and ‘asana’ means a ‘pose’. Siddhasana is mentioned in the Hatha Yoga textHatha Yoga Pradeepika as one of the four most powerful sitting poses suited for meditation.

The Accomplished or Adept Pose (Siddha-asana) is complicated to describe but is actually one of the simpler sitting postures. It requires less flexibility of the legs than the padma-asana yet it facilitates relaxation, concentration and ultimately, meditation.

Siddha-asana helps to establish an equilibrium throughout the body/mind. It will also help stretch the legs and pelvic area to the point where the padma-asana can be held effortlessly. Either posture, by creating a firm foundation with the legs locked in a crossed position and the spine held straight and motionless, awakens the attention and helps cultivate concentration. When concentration is highly focused and undistracted, meditation follows.

Benefits of the Accomplished or Adept Pose (Siddha-asana)

  • Siddhasana is one of the main poses used for meditation. One can maintain this position for a long duration. Those who have difficulty practicing Padmasana can easily practice Siddhasana for extended periods. This asana holds the spinal column straight and steady.
  • In Siddhasana, the heel is kept pressed against the Mooladharachakra. This ensures that the energy currents flow upwards towards the spine.
  • The position of the heels also stimulates the lower two chakrasMooladhara and Swadhistana. The sexual energy is channelized upwards and converted into subtle energy called ‘ojas’.
  • It also gives the practitioner control over his sex urge and the sexual functions.
  • In Hatha Yoga Pradeepika, it is said that Siddhasana stabilizes the nervous system by calming down the pranic energy.

The Accomplished or Adept Pose (Siddha-asana) Instructions

The Accomplished or Adept Pose (Siddha-asana)
  1. Begin in a seated posture. Bend the left knee and grasp the left foot with both hands and place the heel against the perineum and the sole of the foot against the inside of the right thigh. 
  2. Exhale and reach down and loop the forefinger of the right hand around the big toe of the right foot and grasp the left foot with the left hand. 
  3. Bend the right knee, grasp the right foot with both hands and place the outside edge of the right foot where the calf and thigh of the left leg meet, right ankle over left ankle. The heel of the right foot should line up approximately with the navel and be as close to the pubic area as possible.
  4. With palms up, place the hands on the knees, form a circle with the thumb and forefinger and extend the remaining fingers straight ahead. 
NOTE: For women performing in bare feet, make sure the feet are thoroughly clean before placing the lower heel in proper placement, which is at the entrance of the vagina.

Duration/Repetitions: Sit in the siddha-asana for a minimum of 1 minute and extended the time up to ten minutes or more. 

Beginner Tips of the Accomplished or Adept Pose (Siddha-asana)

Many people find it easier to sit on a cushion or folded blanket. This puts less stress on the knees. If the top foot does not rest comfortably against the abdomen, position it halfway down the thigh.

Read More »

7 things you must know about baking

Baking
Baking tips

Baking is a good hobby or business to start, and to some it is quite simple, for others it may be a bit more challenging. We all want to impress others. If we bake, we want the dish to come out exactly as we intended it to be. We all want our cakes to look good, but that doesn’t mean it has to follow an elaborate procedure for baking. Baking a cake or pastry with a simple recipe that is convenient to follow and use at home can do wonders for you.

But unlike other types of cooking, we can’t cheat on baking. We can’t alter the amount and type of ingredients according to our choice and availability. If you think you can make small careless mistakes while baking and it won’t affect anything, then you are gravely mistaken. This is the main reason for people shying away from baking by thinking it is a tedious, unsatisfying work to do. But actually, it is not so. You just have to take care of the small things for the big things (here, cake/pastry/cookies) to fall right into place.

I've decided to come up with a short list of five important tips that will be helpful to anyone who is baking or has recently decided to venture into home baking.
  1. CHOOSE A GOOD AND STICK TO THE RECIPE: Baking is an exact science, unlike cooking, reducing or increasing measurements randomly can spell disaster in your end product. If you don’t have a good recipe to start with, the results aren’t likely to be delicious. Always remember, bad recipe is equal to bad result. A bad recipe is confusing and has a disproportionate and odd combination of ingredients. A good recipe is always easy to follow, and is created with tweaks and turns to the standard one to suit your convenience.

    You should always choose a recipe that matches your baking abilities and the type of ingredients you have. Also, you should also follow the recipe accurately from start to finish, and check the results time to time, and make sure they match with those written in the recipe. Do not substitute the ingredients or alter the recipe until you feel confident enough.
  2. QUALITY MATTERS: The quality of ingredients matter. Buy the best you can afford. If it is unsalted butter, buy it from a reputable company. If it is wheat flour, my favorite is self-rising flour, they make quality baking flours. Your quick breads will always taste exceptional when made with quality ingredients. 
  3. ACCURACY IS IMPORTANT: When measuring dry goods like flour, don't spoon ingredients into the measuring cup. It is easier to dip the cup into the flour, then with a straight-edged object like a knife, sweep away the excess. This method will save you from a ruined recipe due to less or more ingredients. 
  4. PREHEAT THE OVEN: You should always preheat the oven, at least 10-20 minutes before you put the cake batter inside it. This is one of the most important steps which should definitely not be forgotten, otherwise it will result in a cake that is under-cooked or not risen properly.
  5. GET A THERMOMETER: Oven temperature dials are unpredictable and can often be wrong. If you are a passionate baker who is concerned about accuracy, like myself, invest in a thermometer that accurately measures oven temperature. 
  6. MIXING THE CONTENTS WELL: Properly mix the ingredients of the batter. The dry ingredients should be sifted together really well. Once the dry ingredients are mixed, add the wet ones and mix properly again. Refrain from over mixing the batter as it will result in a tough cake due to hardening of gluten and will give a chewy taste.
  7. NO PEEKING: Avoid opening the oven door while baking. Peeking allows heat to escape and a cake that is baking may not have formed yet, disturbing it may leading to sinking in the middle. 
Read More »

Yoga Posture Guide - The Lion Pose (Simha-asana)

www.yogabasics.com

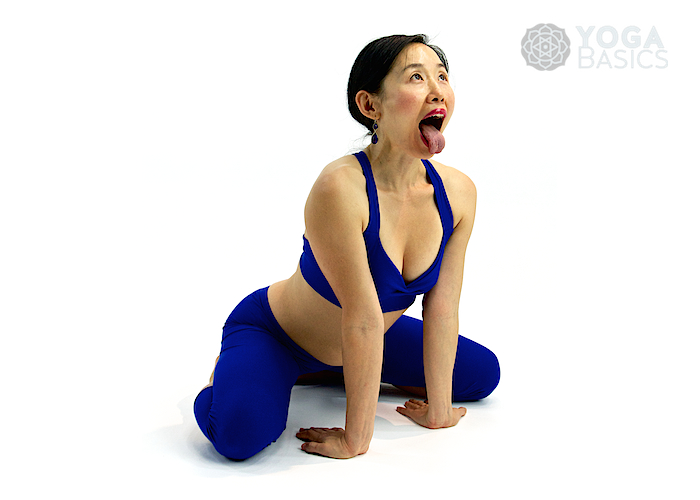
The yoga Lion Pose is a very uncommon yoga pose in that it does not require any bending or stretching of the body. It is a pose that helps relieve stress. It is called the Simhasana because in Sanskrit, ‘simha’ means all powerful and is the term commonly used to denote a lion. The Lion Pose for kids is very popular because of the way the pose is held. In fact, children tend to perform the Lion Yoga Pose better than adults!

We use our voices to communicate. We can whisper, speak, sing, or scream, and shade our expression with many nuances. When we are nervous, scared, happy, or sad, others hear it in our voice. A friend may tell you on the phone that everything is fine, but you know by the tone of her voice it’s not true. Our voices reflect not only our state of mind but also the state of our nervous system.

Try The Lion Pose (Simha-asana) when you feel angry or anxious, or when you haven’t expressed yourself the way you wanted. Perhaps you’ll find yourself happier, more grounded, and lighter—emotionally and physically.

Translation: The Sanskrit word simha which literally means "the powerful one" is the word for "lion." This, therefore is known as the lion posture, and one performing it can be said to resemble a roaring lion about to attack.

Pronunciation: sin-gha-sa-na

Difficulty: (2) 

This pose is also called Simhagarjanasana.

The simha-asana benefits parts of the body that most other asanas do not: the face, jaw, mouth, throat and tongue. Those who experience tightness or discomfort in the jaws such as teeth grinding, clenched jaws, a misaligned bite, etc. will benefit from both the jaw and tongue stretching of the simha-asana. This asana is also known to help prevent or cure sore throats. The muscles and tissues of the face are rejuvenated from the alternating stretching and release, an exercise they rarely get in the course of our everyday lives. The fixed gaze relieves tense or burning eyes and the stretched fingers benefits the hands and wrists.

Benefits of Simhasana (The Lion Yoga Pose)

  • The practitioner develops a beautiful and sonorous voice. It helps to solve many voice related problems.
  • This asana is said to remove defects of the throat, nose, mouth and ears. It is known to remove bad breath.
  • It helps in cases of stuttering.
  • It relieves tension in the chest and the facial muscles and makes the face look young. Steady breathing in this position helps the chest and the abdomen.
  • According to the Hatha Yoga text Hatha Yoga Pradeepika,Simhasana aids in performing the three bandhas or locks namely,Moola bandha, Uddiyana banda and Jalandara bandha.
  • In the yogic text Gheranda Samhita, Simhasana is described as the destroyer of all diseases.
  • Relieves tension in the face and chest
  • Improves circulation of blood to the face
  • Keeps your eyes healthy by stimulating the nerves
  • Stimulates and firms the platysma
  • Helps prevent sore throat, asthma, and other respiratory ailments
  • Is said to eradicate disease

The Lion Yoga Pose (Simha-asana) Instructions

  1. Sit up on the knees with the heels of the feet pressed against the buttocks and the calves of the legs flat on the floor. 
  2. Place the balls of the hands on the knees, straighten the arms and keep the back erect and the head straight (not tilted forward, back, to the left or the right). 
  3. Inhale while leaning forward slightly, stretching the mouth the jaws as wide as possible, extend the tongue out and downward as much as possible, fix your gaze either at the tip of the nose or between the eyebrows and stretch the fingers straight out from the knees. 
  4. Hold the posture for the duration of the inhaled breath then exhale, relaxing the forward stretch, dropping the fingers to the knees and closing the mouth and eyes. 
Duration/Repetitions: Hold the simha-asana for thirty to sixty seconds and repeat three to five times. 

Variations

Since the Simhasana is such an easy pose, there are not too many variations. However, since the focus is on relaxation, different people make slight variations to the way they perform the pose. Listed below are some of the variations for lion pose.
  • Variation 1: Some people like to sit with their ankles crossed, so that you sit on one heel instead of two.
  • Variation 2: As you are supposed to sit completely relaxed and because the most relaxed position while holding this sitting position is to have your hands on your knees, many people do that and just splay their fingers while exhaling.
  • Variation 3: Some use the same pose, but laugh instead of roar in order to reduce stress.
  • Variation 4: Instead of closing the eyes and looking to the third eye, this pose is sometimes held with the eyes open and looking to the tip of the nose.
The Simhasana has to be a violent release of tension. Many people follow a lackadaisical approach to this pose, with their exhaling not being violent enough. Even their throwing out their arms and splaying out their fingers is not done with much energy. This pose is an outlet for pent up anger and just as a half-hearted punch at a punching bag will not release much of your frustration, half-heartedly following the yoga lion pose will not give your many benefits.

Read More »

Yoga Posture Guide - The Mountain Pose (Tada-asana)

Translation: The Sanskrit word tada means mountain. This posture is also known by the name samasthiti-asana. Sama means unmoved, equilibrium, and sthiti means standing upright or firmly, abiding, remaining, thus samasthiti means standing firmly without moving.

Pronunciation: ta-dah-sa-na

Difficulty: (1)

The Mountain Yoga Pose is a great way to learn proper posture, alignment, and balance, and to develop strength in all the muscles needed for upright yoga positions. But we'll admit: it kind of just looks like standing.

Many common ailments and discomforts can be traced to poor posture. If the spine is not properly aligned or if there is tightness or stiffness in the back, the result is often an imbalance in the body. When this imbalance becomes chronic many kinds of disorders arise in the organs, glands and nervous system.

Performing the tada-asana allows one to observe one's posture closely and clearly recognize those problems which get masked or ignored by day-to-day activities. As the posture is held and the breath, mind and body is quieted various effects will surface to indicate difficulties with the spine. Favoring one foot over the other, shifting back and forth, drooped shoulders, tightness in the neck and upper or lower back, and various other physiological disturbances may appear indicating the need for further yoga practice.

The proper execution and continual practice of the tada-asana along with other postures helps to re-train the body to stand correctly and reverse the negative effects of poor posture.

When the tad-asana is performed properly and the mind is focused and free of distraction, the body is experienced as being rooted firmly to the earth and as steady and motionless as a mountain.

Benefits of Mountain Yoga Pose

A correctly executed Tadasana will use every muscle in the body. It improves posture and, when practiced regularly, can help reduce back pain. This pose strengthens the thighs, knees, ankles, abdomen, and buttocks. It is also helpful for relieving sciatica and for reducing the effects of flat feet.

The Mountain Pose (Tada-asana) Instructions

  1. Stand with both feet touching from the heel to the big toe, keeping the back straight and the arms pressed slightly against the sides with palms facing inward. 
  2. Slightly tighten or flex the muscles in the knees, thighs, stomach and buttocks maintaining a firm posture. Balance you weight evenly on both feet. 
  3. Inhale through the nostrils and lift the buttocks off the legs arching the back and thrusting the abdomen forward and tilt the head as far back as possible. See video
Duration/Repetitions: One repetition for several minutes is advisable. The tada-asana is also recommended prior to and following any other standing posture.

Contraindications and Cautions

Headache
Insomnia
Low blood pressure

Modifications and Props

You can check your alignment in this pose with your back against a wall. Stand with the backs of your heels, sacrum, and shoulder blades (but not the back of your head) touching the wall.

Variations

You can alter the position of your arms in a variety of ways; for example: stretch the arms upward, perpendicular to the floor and parallel with each other, with the palms facing inward; interlace the fingers, extend the arms straight in front of your torso, turn the palms away, then stretch the arms upward, perpendicular to the floor, so the palms face the ceiling; cross the arms behind your back, holding each elbow with the opposite-side hand (be sure to reverse the cross of the forearms and repeat for an equal length of time).

Beginner's Tip: You can improve your balance in this pose by standing with your inner feet slightly apart, anywhere from 3 to 5 inches.

More yoga poses for you: Yoga postures


Read More »

Yoga Posture Guide - The Corpse Pose (Shava-asana)

The Corpse Pose (Shava-asana)


The Corpse Pose (Shava-asana) Translation

The Sanskrit word shava means corpse hence this is the Corpse. The shava-asana is also known as the mrta-asana.
Pronunciation:  sha-vah-sa-na  
Difficulty:  (1)      

While many consider this a simple posture at first, its simplicity eventually proves to be deceiving. The goal of the shava-asana is for the body and mind to be perfectly still and relaxed. Not only should the body be motionless and at ease, but the mind as well should be quiet, like the surface of a still lake. The result will be a deep and stable relaxation that will extend into your meditation or be felt through the activities of your daily circumstances.  

It goes without saying that the shava-asana will take some time to perfect. You will find the simple exercise of focusing your attention on each part of your body and consciously directing the breath there to be a great help with this posture. 

There are two common obstacles that can prevent you from fully benefitting from this posture: sleepiness and a restless mind. If find yourself getting drowsey while in the shava-asana increase the rate and depth of your breathing. If your mind is restless or wondering focus your attention on all of the bodily senations you're experiencing. Bring your mind to the sensation of the floor beneath you or on the rhythm of your breath.  

While practing your Yoga-asana routine you should always begin and end each session with the shavaasana. 

Benefits of the Corpse Pose (Shavasana)

  • This posture brings a deep, meditative state of rest, which may help in the repair of tissues and cells, and in releasing stress. It also gives time for the yoga workout to sink in at a deeper level.
  • This posture leaves you in a state of rejuvenation. It is the perfect way to end a yoga session, particularly if it has been a fast-paced one.
  • It helps reduce blood pressure, anxiety, and insomnia.
  • This is an excellent way to ground the body and reduce the Vata dosha (imbalance of the air element) in the body.

Instructions to the Corpse Pose Translation (Shava-asana)

  1. Lie flat on your back with your legs together but not touching, and your arms close to the body with the palms facing up. 
  2. Keep your eyes gently closed with the facial muscles relaxed and breath deeply and slowly through the nostrils. 
  3. Starting at the top of the head and working your way down to the feet, bring your attention to each part of your body, consciously relaxing it before proceeding on to the next. 
  4. Remain in the shava-asana for between 3 and 5 minutes or longer. If you become sleepy while in the shava-asana begin to breath a bit faster and deeper. 

Duration/Repetitions: We recommend that you begin your period of yoga-asana practice with at least 3-5 minutes of shava-asana. Return to it periodically thought your posture session to relax and rejuvenate the body/mind and then conclude your session with at least 3-5 minutes more.  

Common Challenges of the Corpse Pose (Shava-asana)


This simple-sounding pose is more difficult than you might realize. The body can cause distractions that make it a challenge. Your body might feel cold, itchy, or unsettled. Shavasana occurs at the end of the yoga practice to remedy this obstacle.

By the time you’ve completed asanas, or postures, your body and mind should be tired enough to be able to relax sufficiently for Shavasana. Think of it like taking your dog to the park or your kid to Disneyland—the drive home is often the quietest and calmest of the day.

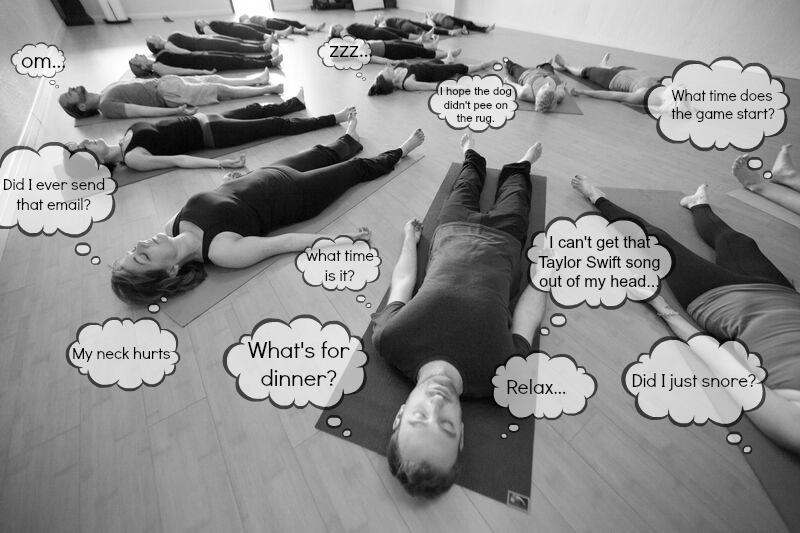
Even if your body is amenable to the rest, your mind can get in the way. Some common thoughts that pop up during Shavasana:
  • How much longer will we be here?
  • Did that guy just snore? That’s embarrassing.
  • I hope I didn’t just snore.
  • What am I making for dinner when I get home?
  • Is this relationship really working out?
  • I’m hungry.
  • What’s my life all about, anyway?
  • I smell like sweat.
  • Did I remember to pay the meter?
  • Maybe I should quit my job.
It’s normal for the mind to try to resist this deep relaxation. Shavasana is the ultimate act of conscious surrender. It takes practice and patience to surrender easily.

With the world moving so quickly, cultivating the art of Shavasana is more valuable than ever. Our society tends to place greater value on speed and productivity; learning how to do nothing is a skill that can help you become more productive when you need to be.

Shavasana helps us learn how to completely surrender, stop fighting the clock, and make space for peace and harmony to fill the soul. Shavasana is like turning off your computer when it’s acting up. Once you reboot it, the computer often has greater functionality.


See Why Savasana Is the Hardest Yoga Pose
More yoga for you http://www.teambuildingafyakenya.com/search/label/Yoga
Read More »

Saucy Fries Recipe

Saucy Fries Recipe By Jennifer Ananda, June 29, 2016  


This is a tangy, spicy and yummy quick fix snack that can be put together without much effort as long as all the ingredients are on hand. Perfect for those dull afternoons when you're craving some spicy carbs! 
Prep Time: 10 minutes
Cook time: 1 hour
Yield: serves: 4
Tags: Low Fat
Nutrition facts: 433 grams calories, 28 grams fat 1 gram sugar 1 gram fiber 38 grams protein

Ingredients: - for the oven-baked fries: 6 large potatoes, sliced into 1 cm wide chips/fries - 3 tablespoons oil - salt, to taste - for the creamy mushroom sauce: 500 grams (2 punnets) mushrooms, sliced - 2 garlic cloves, crushed - 1 cup cream (heavy/whipping) - 1 cup full cream milk mixed with 1 teaspoon corn flour (corn starch) - juice of ½ lemon - salt & pepper to taste - chopped parsley, to serve ...

Instructions:
To make the fries, pre-heat the oven to 220°c. In a large bowl, toss the sliced potatoes and oil together then transfer to a greased baking tray. Ensure the potatoes are in an even layer, use more trays if necessary. Place the trays in the oven and allow to bake for 45 minutes - 1 hour, turning the fries halfway through, until the fries are golden brown and crisp. Remove from the oven and season with salt. To make the sauce, fry the mushrooms in 2 tablespoons of oil until golden brown then add the garlic and sauté for 30 seconds. Add the cream and milk then allow to come to a gentle simmer. Cook the sauce for 10 minutes until thickened then season with lemon juice, salt and pepper. Serve the sauce over the fries and sprinkle with fresh parsley.


Read More »

Yoga Posture Guide - The Head-stand (Sirsha-asana)

Translation:  The Sanskrit word sirsha means head. This posture is the well-known headstand posture, and perhaps second only to the padma-asana or lotus posture, is widely identified with the practice of Yoga.  
Pronunciation:  sir-shah-sa-na  
Difficulty:  (7) 
The Head-stand (Sirsha-asana) is complicated to describe but is actually one of the simpler sitting postures. It requires less flexibility of the legs than the padma-asana yet it facilitates relaxation, concentration and ultimately, meditation. 

Siddha-asana helps to establish an equilibrium throughout the body/mind. It will also help stretch the legs and pelvic area to the point where the padma-asana can be held effortlessly. Either posture, by creating a firm foundation with the legs locked in a crossed position and the spine held straight and motionless, awakens the attention and helps cultivate concentration. When concentration is highly focused and undistracted, meditation follows. 

Health Benefits of the Head-stand (Sirsha-asana)

It stimulates four of the most important endocrine glands - the pituitary, the pineal, the thyroid, and the parathyroid glands. It has a very beneficial effect on the whole body.

It improves many ailments, such as nervousness, tension, fatigue, sleeplessness, dullness, fear, poor blood circulation, bad memory, asthma, headaches, constipation, congested throat, liver or spleen, for female disorders, the initial stages of eye and nose troubles, and general lack of energy, vitality or self confidence.

It promotes hair growth by increasing circulation to the scalp improved brain function (intelligence and memory) and increased vitality and confidence.

It keeps the spine into correct alignment.

It restores the position of vital organs by reversing gravity.

It improves sleep.

The Head-stand (Sirsha-asana) Instructions

    The Head-stand (Sirsha-asana)
  1. Sit in a kneeling position with the buttocks resting on the heels of the feet. 
  2. Lean forward and place the forearms on the floor in front while keeping the elbows about shoulder distance apart. Interlock the fingers of both hands. 
  3. Place the top of the head flat on the floor with the back of the head pressed against the inside of the interlocked fingers. 
  4. Placing the tips of the toes firmly on the floor while lifting the heels, raise the knees off the floor. 
  5. Hold for the duration of the held inhaled breath. When you can't hold the breath comfortable any longer, slowly exhale and return the back to the floor, slide the legs out straight returning to the shava-asana.  

Duration/Repetitions: Hold the sirsha-asana for 15-30 seconds when you first attempt it and increase the duration gradually over a period of a few weeks. As you skill increases you should hold it for as long as you feel comfortable. 

Cautions/Restrictions: If you are new to Yoga we recommend that you find a qualified instructor to teach you this posture and monitor you performance. If you attempting this alone position yourself in front of a wall as mentioned above. 

If you are suffering from high or low blood pressure you should not attempt this posture. 
The sirsha-asana should not be performed by woman who are menstruating, as is the case with all inverted postures (where the legs are raise over the head). 

Note
  • It is recommended that, before attempting the Sirsha-asana beginners first mastered some of the more basic postures like Sarvanga-asana, Dhanura-asana, Ugra-asana, etc.
  • Beginners may start this in a corner so that they can practice it without the fear of falling down.
  • If you are suffering from high or low blood pressure you should not attempt this posture. First get your blood pressure normal by natural means like good nutrition, other asana etc.
  • The sirsha-asana should not be performed by woman who are menstruating, as is the case with all inverted postures (where the legs are raise over the head).
  • If you have any serious eye diseases, constipation, pus in your ears, chronic nasal catarrh, defective pituitary, pineal or thyroid gland, neck injury. Avoid this asana, it’s better to consult your physician.


Variations: There are several variations to the sirsha-asana that you can try when you are comfortable with the standard variation. First try spreading your legs wide apart, carefully separating them very slowly, while maintaining your balance, until they are as far apart as is comfortable. Bring your legs together before returning from the posture. Next you can try placing the soles of your feet together while steadily holding the pose.  

More visit Yoga Poses
Read More »

Yoga Posture Guide - The Shoulder-stand Pose (Sarvanga-asana)

Translation of the Shoulder-stand Pose (Sarvanga-asana)

The Sanskrit word sarvaanga means limb or body. sarvanga therefore translates as either "all-limb" or "whole-body posture". It is so named because of the benefit it provides to the entire body. It is commonly referred to as the "shoulderstand" because one is essentially standing on one's shoulders.
More yoga postures for you All Yoga Postures

Pronunciation: sar-vong-ah-sa-na

Difficulty: (5)
The Shoulder-stand Pose (Sarvanga-asana)

The Shoulder-stand Pose (Sarvanga-asana) is considered by many to be the most beneficial of all yoga postures. Because of its many benefits, if you find that your time is limited in the course of Yoga practice at home, it is recommended to place special emphasis on the sarvanga-asana.

When performed in the morning the sarvanga-asana relieves fatigue caused by sleeping too much or too little and when practiced in the evening it helps to promote deep, restful sleep. It strengthens the back and helps to relieve lower back pain.

The increased blood flow to the head and upper body helps to heal many disorders such as headaches, nasal congestion and sore throats. The entire endocrine, digestive, nervous, and venous systems of the body are stimulated in ways that no form of diet or conventional exercise can perform.

Because the body is inverted a rich supply of oxygenated blood is sent to the organs and glands in the upper part of the body, such as the brain, thyroid and pituitary, and heart thereby stimulating them. Pressure is relieved from the lower body extremities relieving pain and/or swelling of the feet and legs. The sarvanga-asana also provides great benefit to the abdominal organs helping to relieve gas and constipation and stimulate digestion. Regular practice of this posture invigorates the mind and helps to calm the nervous system.

Step by step Instructions for the Shoulder-stand Pose (Sarvanga-asana)


  1. Lie flat on the back in the shava-asana. 
  2. Inhale through the nostrils. Place the palms face-down on the floor. Keeping the hips on the floor, bend the knees and bring them up toward the stomach while exhaling. 
  3. Inhale slowly through the nostrils, press down on the hands and lift the torso from the waist up off the floor, arching the spine backwards and straightening the arms. Keep the hips on the floor. 
  4. Inhale, then while exhaling, raise the legs straight up perpendicular to the floor. You may support your hips with your hands or leave the arms flat on the floor, whichever is most comfortable. 
  5. The legs should be together with the knees straight and toes pointed straight up. Keep the head straight without turning it to either side. The chin should be pressed against the chest. 
  6. Breath gently through the nostrils while the posture is held. 
  7. Reverse the steps to return to the shava-asana. 


Duration/Repetitions: Hold the sarvanga-asana anywhere from one to five minutes depending on comfort. Repeat the posture two or three times.

Variations to the Shoulder-stand Pose (Sarvanga-asana)

There are two common variations to this posture. One is called the shalamba-sarvanga-asana. Sa means with and alamba means prop or support and refers to the use of the arms to support the legs and torso as they are inverted. The other variation is called the niralamba-sarvanga-sana. Nir means without and thus this variation is done without the support of the arms.

Benefits of the Shoulder-stand Pose (Sarvanga-asana)

  • Stimulates the thyroid and parathyroid glands and normalizes their functions
  • Strengthens the arms and shoulders and keeps the spine flexible
  • Nourishing brain with more blood
  • Stretches the heart muscles by returning more venous blood to the heart
  • Brings relief from constipation, indigestion and varicose veins
  • Calms nerves
  • Reduces anxiety, insomnia, and irritability

Contraindications of the Shoulder-stand Pose (Sarvanga-asana)

  • Menstruation 
  • High blood pressure 
  • Glaucoma 
  • Detached retina 
  • Pregnancy 
10 Reasons to Practice Shoulder-stand Every Day


Read More »

Natural treatments for congestion


Many people think that a nose gets congested (stuffy) from too much thick mucus. However, in most cases, the nose becomes congested when the tissues lining it becomes swollen. The swelling is due to inflamed blood vessels.

Newborn infants must breathe through the nose. Nasal congestion in an infant’s first few months of life can interfere with nursing, and in rare cases can cause serious breathing problems.

Nasal congestion in older children and adolescents is usually just an annoyance, but it can cause other difficulties.

Nasal congestion can interfere with the ears, hearing, and speech development. Significant congestion may interfere with sleep.

When nasal stuffiness is just on one side, the child may have inserted something into the nose.

A stuffy nose is usually caused by a virus or bacteria, resulting from the common cold, flu or a sinus infection, and disappears within a week.

Natural treatments

Leak (Allium ampeloprasum)

Eat the leek to relieve congestion in the respiratory passages.

Galanga (Alpinia galanga)

Place a small piece of crushes galangal in 3 or 4 cups of boiling water and allow it to infuse for 3 to 6 hours. Filter and add 2-3 tablespoon of sugar crystals. Take 2 tablespoons, 3 times a day.

Indian Long Pepper (Piper longum)

Make a decoction out of 1 teaspoon each of ground Indian long pepper, cloves (Syzygium aromaticum) and rock salt. Filter the decoction and drink it while it is still warm for sinus congestion.

Turkey Berry (Solanum torvum)


For chest congestions, fry 2 or 3 teaspoons of dried berries in a little clarified butter or ghee and powder them. Add this powder to every meal, 3 times a day.

Home Treatments

When you’re stuffed up, focus on keeping your nasal passages and sinuses moist. Although people sometimes think that dry air might help clear up a runny nose, it actually has the opposite effect. Drying out the membranes will irritate them further.

  • To keep your nasal passages moist, you can:
  • Use a humidifier or vaporizer.
  • Take long showers or breathe in steam from a pot of warm (but not too hot) water.
  • Drink lots of fluids. This will thin out your mucus, which could help prevent blocked sinuses.
  • Use a nasal saline spray. It’s salt water, and it will help keep your nasal passages from drying out.
  • Try a Neti pot, nasal irrigator, or bulb syringe. Use distilled, sterile water or H2O that’s been boiled to make up the irrigation solution. Rinse the irrigation device after each use and let it air dry.
  • Sit a warm, wet towel on your face. It may relieve discomfort and open your nasal passages.
  • Prop yourself up. At night, lie on a couple of pillows. Keeping your head elevated may make breathing more comfortable.
  • Avoid chlorinated pools. They can irritate your nasal passages.
Read More »

Natural treatment of chapped lips

Chapped lips

We’ve all faced the dryness, redness, cracking, flaking, and soreness of chapped lips. Typically, they’re a harmless, yet uncomfortable and unsightly problem. Chapping happens when your lips can’t produce natural oils to moisturize themselves. Cold and chilly winter air, wind and the low humidity indoors all leads to a crisis for your lips in the form of dehydration. Once moisture is sapped from skin cells, they become fragile, so your lips develop tiny splits and cracks. These tiny tears are what make chapped lips so painful - heat, acidic food, even toothpaste can aggravate raw skin…. Read more

Vitamin deficiencies, dehydration, smoking, allergic reactions, sun and wind exposure, harsh weather changes, and skin disorders can all cause chapped lips, and chapped lips can lead to other health problems, like cold sores and bacterial infections. Read more about its causes here What causes chapped lips

Your lips can become chapped and dry when they're exposed to the sun, wind or cold air. A lip balm containing petroleum or beeswax will provide a barrier and help seal in moisture.
What not to do

It's very tempting to pick and bite off flakes of dried skin, but this will only make your lips bleed and heal more slowly. Licking our lips doesn’t help, because it dehydrates the skin, and our saliva also contains acids that helps break down food and these irritate the lip skin: as does the process of scrubbing peeling or biting off skin flakes.

Irritating the skin around your mouth may also trigger a cold sore if you're prone to getting them.

It's also tempting to keep licking dry or cracked lips. But this will only dry your lips more, as the saliva evaporates and the repeated licking or wetting "washes" the natural grease off the skin.

Factors inside and outside your body can dry out your lips. Want to keep your whistle wet?

Drink up. You know it has tons of benefits for your body. One of those is to fight the dehydration that leads to chapped lips.

Use a humidifier indoors. These devices provide the moisture your lips and skin crave. It’s great to have one at work as well as at home, especially in the winter. Turn it on at night to replenish your skin while you sleep.

Don’t lick your lips. While it might seem like a good idea at the time, running your tongue over your lips is the worst thing you can do for them. As your saliva dries, it takes more moisture from your skin. Reach for your lip balm instead.

Natural treatment

Peanut (Arachis hypogaea)

Use fresh peanut oil to treat chapped lips.

Caution: Peanuts are not recommended for those who suffer from arthritis and people with weak stomachs. Those who suffer from peanut allergies should not use this treatment.
Read More »

How to Maximize the Health Benefits of Herbs and Spices


Research about the therapeutic effects of herbs and spices is enticing, but how does it translate to what you eat every day?  Quite easily, as a matter of fact. It turns out that relatively small amounts of dried and fresh herbs and spices may have health benefits.

For example, Heber says it’s reasonable to expect benefits from 1.5 teaspoons of ground cinnamon. Spread it throughout the day to make it most palatable.

“Use herbs and spices at their peak to get the most out of them,” Geagan says. “The active compounds in herbs and spices degrade with time.”

Capitalize on the potency of dried herbs and spices by purchasing brands with “Best By” dates on them, and storing them in airtight containers away from heat, moisture, and direct sunlight.

Using fresh herbs or spices? Double the amount to get the same levels of active substances in their dried counterparts, Heber says.

Tips on how to incorporate more herbs and spices into your favorite foods.

Herbs and Spices: A Little Goes a Long Way

You don’t need to make drastic changes in your eating plan to benefit from seasonings. Here’s how to incorporate more herbs and spices into your favorite foods.
  • Ground cinnamon: Add 1.25 teaspoons to prepared oatmeal; 1 cup Greek yogurt mixed with 2 teaspoons molasses or honey, or artificial sweetener; and French toast batter. Sprinkle half a teaspoon of cinnamon over ground coffee before brewing. Top a fat-free latte or hot cocoa with ground cinnamon.
  • Chili peppers: Add chopped peppers to chili, burgers, soups, stews, salsa, and egg dishes.
  • Turmeric:  Sprinkle on egg salad. Mix half a teaspoon turmeric with 1 cup Greek yogurt and use as a dip or sandwich spread. Add to chicken or seafood casseroles, and to water when cooking rice.
  • Garlic: Add fresh chopped or minced garlic to pasta dishes, stir-fry dishes, pizza, fresh tomato sauce, and meat and poultry recipes. 
  • Oregano: Add 1/8 teaspoon dried to scrambled eggs, salad dressings, and store bought or homemade marinara sauce. Sprinkle some on top of pizza, and stir into black bean soup.
  • Basil: Make a sandwich with low-fat mozzarella cheese, sliced tomatoes, and fresh basil leaves; add fresh leaves to green salads.
  • Thyme: Sprinkle dried thyme onto cooked vegetables in place of butter or margarine. Add 1/8 teaspoon dried thyme to two scrambled eggs, and to salad dressings. Use it in a rub when cooking salmon. Add fresh thyme to chicken salad and chicken soup.
  • Rosemary: Add dried crushed rosemary to mashed potatoes and vegetable omelets.
  • Parsley: Add chopped flat leaf parsley to meatballs and meat loaf, and to bulgur salad.
  • Ginger: Grate fresh ginger into quick bread batters and vinaigrette. Add chopped ginger to stir-fries. Sprinkle ground ginger on cooked carrots.
  • Cloves: Sprinkle ground cloves on applesauce, add to quick bread batters, and add a pinch to hot tea.


Read More »

Keeping Your Baby Safe


Making your baby’s world as safe as you can is part of being a parent. To keep your baby safe, you need to watch him. Never leave an infant alone — even for a second — except in a safe crib or playpen.

Parents need to protect their babies’ health. This is just as important as keeping your baby safe from accidents. If people in your family have allergies, you may want to make it less likely that something in your home will trigger an allergic reaction in your baby. Ask your doctor or public health nurse for more details on preventing allergies.

A safe infant car seat is one of the first things you should buy for your baby. The law says that babies must always ride in an approved infant car seat. This includes the trip home from the hospital. Your baby’s car seat should:
• Face backward
• Be fixed in place with the seat belt and have the harness fastened across the baby’s chest
• Support your baby’s head and neck. You can use a rolled up blanket for this.

The safest place for the baby’s car seat is in the centre of the back seat. Never put an infant seat in front of an air bag.

Another way to keep your baby safe is to childproof your home. New babies will not crawl around on the floor or put things in their mouth. But it is wise to prepare for when this happens. Start now. Make your home safe before your baby learns to roll over, sit up, or crawl.

Check the floor, shelves, tables, and cupboards. REMOVE: • Small things that a baby can swallow or put into his ears and nose • Sharp or rough things that can cut or scrape a baby • Plants low enough to be pulled over or eaten • Lamp cords long enough for a child to get tangled in or cords that a baby can use to pull something down on himself • Cords for blinds or drapes from baby’s reach by tying them up. Make sure not to put your baby’s crib near a window with blinds that have cords or near a window that does not have a window guard.

Start to buy: • Safety gates for stairs • Covers for electric plugs (Be sure they are not small enough for the baby to swallow.) • Locks for cupboards • Hooks to keep drawers closed


All the things you buy for your baby should be safe and well made. This includes strollers, high chairs, clothing, toys, and soothers. Talk with your public health nurse, St. John Ambulance or the Red Cross to learn more about child safety.
Read More »

Natural treatments for common cold

The common cold is a viral infection of your upper respiratory tract - your nose and throat. A common cold is usually harmless, although it may not feel that way. If it’s not a runny nose, sore throat and cough, it’s the watery eyes, sneezing and congestion - or maybe all of the above. In fact, because any one of more than 100 viruses can cause a common cold, signs and symptoms tend to vary greatly…
Common cold

How do colds spread?

In general, a person becomes contagious from a few days before their symptoms begin until all of their symptoms have gone. This means most people will be infectious for around two weeks.

You can catch the virus from an infectious person by:
Touching an object or surface contaminated by infected droplets and then touching your mouth, nose or eyes  touching the skin of someone who has the infected droplets on their skin and then touching your mouth, nose or eyes inhaling tiny droplets of fluid that contain the cold virus - these are launched into the air when an infected person coughs or sneezes

Colds spread most easily among groups of people in constant close contact, such as families and children in school or day care facilities. They're also more frequent during the winter, although it's not clear exactly why.

A number of different viruses can cause a cold, so it's possible to have several colds one after the other, as each one may be caused by a different virus.

To lower your chances of getting cold:

  • Always wash your hands. Children and adults should wash hands after nose-wiping, diapering, and using the bathroom, and before eating and preparing food.
  • Disinfect your environment. Clean commonly touched surfaces (such as sink handles, door knobs, and sleeping mats) with an EPA-approved disinfectant.
  • Choose smaller daycare classes for your children.
  • Use instant hand sanitizers to stop the spread of germs.
  • Use paper towels instead of sharing cloth towels.
Most people recover from a common cold in about a week or two. If symptoms don’t improve see your doctor.

Natural treatments

Ginger (Zingiber officinale)

Make an infusion of the rhizome.

Orange (Citrus sinensis)

Eat the ripe fruit.

Lemon (Citrus limon)

Drink 4-8 glasses of lemon juices a day.

Eucalyptus (Eucalyptus globulus)

Make an infusion of the leaves. Dose: 30 grams to 1 liter of water, 4-5 cups a day.

Chrysanthemum (Chrysanthemum indicum)

Make a decoction of the whole plant to relieve colds.

Satflower (Carthamus tinctorius)

Prepare a hot tea from the flower petals. Dose: 20-30 grams for 1 liter of water, 2-3 cups a day.

Oyster Plant (Tradescantia spathacea)

Make a decoction of the flowers and leaves.
Read More »

BREAD ROLL RECIPE


INGREDIENTS 
4 medium potatoes boiled and mashed
8 slices of bread 
1 tsp. full ginger garlic green chili paste 
handful of chopped coriander leaves 
1/2 tsp. full red chili powder
1/2 tsp. full coriander powder
1/2 tsp. garam masala powder
1/2 tsp. full cumin seed powder
1/2 tsp. full chaat masala 
salt to taste

1 tbsp. of corn flour
METHOD
Heat a tsp. oil in a pan add ginger garlic green chili paste sauté for a minute remove from heat

In a bowl mix boiled and mashed potatoes the sautéed ginger garlic green chili paste red chili powder coriander seed powder cumin seed powder garam masala powder chaat masala and salt
Add a handful of chopped coriander leaves mix everything well and make small balls and shape them 3 inches long
Cut the edges of bread slices then wet the slices a bit do not immerse them completely in water they become soggy very fast and then will be difficult to handle
Then press gently between palms so that all excess water is drained off
Then place the potato ball on the edge of bread slice roll it from one end to other and seal the edges properly as we have wet the bread slices it will stick fast
Press and roll between palms gently to make rolls
Mix 1 tbsp. corn flour with half cup of water well
Dip the bread rolls 1 at a time into the corn flour batter that ways the rolls will not soak much oil if you deep fry them directly they soak a lot of oil
Then deep fry them in medium hot oil till brown
Serve with tomato ketchup 


Read More »

MUTTON CHOPS RECIPE


INGREDIENTS 
500 grams of mutton chops
1 pod of garlic(lasun)
1 inch ginger pieces(adrak)
2 green chilies(hari mirch)
1/2 tsp. full cumin seeds(jeera)
1/2 cup yoghurt(dahi)
1 tsp. full red chili powder(laal mirch)
1 tsp. full coriander seed (dhania powder)
1/2 tsp. full garam masala powder
salt to taste


METHOD 
Grind ginger garlic green chilies and cumin seeds together into coarse paste

Marinate the mutton chops with ginger garlic green chilies and cumin seed coarse paste
Also add red chili powder coriander seed powder garam masala powder salt and yoghurt mix well
Let the mutton chops marinate with the masala for at least 2 hours
Heat a tbsp. oil in a pan add the mutton chops cover and simmer till mutton chops are cooked well and roasted properly open and flip 2 to 3 times in between
Do not add water the yoghurt and the mutton will release its own water let the chops cook in its own moisture
It takes around 40 minutes for the chops to cook completely
You can also pressure cook these mutton chops adding little water after chops are pressure cooked check if any water is left dry it out completely and roast the chops well
Also always use mutton which is of young one it will take less time to cook or the other option is to apply 1 tsp. of raw papaya paste to the chops while marinating it will cook faster
Serve with onion rings tomato slices chili vinegar pudina chutney


Read More »

AVOCADO ICE CREAM RECIPE

Home-made dessert. By Geoffrey Nevine, June 26, 2016  

This classic home-made dessert for all to try. Prep Time: 15 minutes Yield: 1 quart ice cream 
Ingredients: - 3 ripe avocado, chopped - 3/4 cup sugar - 1 cup yogurt - 1/2 cup heavy cream - 1 lime juice - 1/8 tsp. salt ... 
Instructions: Put all ingredients in a blender and blend until smooth. Transfer to a plastic container then freeze for 4 hours. Enjoy.
Read More »

The Best for You and Your Baby


You are pregnant. This is the best time to decide how you want to feed your baby. What you decide depends on your feelings about yourself and what your partner feels.

Breast milk is the perfect food for your baby. It is all your baby needs for the first six months of life. The act of breastfeeding will help your baby learn to love, trust and play. It is good for your baby to have skin contact with you, to look into your eyes and to cuddle.

Breast milk gives your baby what his body needs to help fight disease (antibodies). You will give your baby natural “protection” from disease simply by breastfeeding.

Breastfeeding is good for your baby and will make you feel good about yourself too!

You may get a lot of advice about breastfeeding from friends or relatives. Not everyone agrees that breastfeeding is best. You may feel confused. What should you do? Now is the time to learn the facts about breastfeeding and the risks associated with infant formula. Then you can decide what is best for you, and for your baby.


Breastfeeding Is Best for Babies

Deciding to Breastfeed: Here are some reasons why your milk is best for your baby.

Perfect first food

Breast milk was made to meet babies’ first needs. It is easier for babies to digest than infant formulas (or breast milk substitutes). Babies who are breastfed usually have less colic, burping, upset stomach, constipation, and diarrhea than babies who are fed with formula.

Protection from disease, infection, and allergy

Breast milk protects babies against disease and infection. Food allergies may be less common in babies who have only breast milk for the first 6 months. Breastfed babies have less breathing problems, diarrhea, vomiting, ear infections, juvenile diabetes and childhood cancers.

Baby decides how much to drink

Babies are breastfeed when they are hungry and stop when they are full. They decide how much milk to have. Babies who are fed with formula can be coaxed to take a little more. They may drink more formula than they need.

Good mouth development

A mother’s nipple fits the shape of a baby’s mouth. Babies who breastfeed usually have good jaw development, and their face muscles are strong.

Comforts and makes babies happy

Babies have a natural need to suck. Breastfeeding helps meet that need.

Close bond between mother and baby

Breastfeeding is more than a way to feed your baby. It creates a bond between you and your baby. Your warmth and the closeness of your body help to make your baby feel safe and loved.

Breast milk supplies all of your baby’s food needs during the first 6 months of life. This is the time of most rapid growth during life. Your healthy baby does not need any other foods during this time. That means no food or other drink except vitamin D supplement. Feeding solid foods too early could reduce your milk supply and increase the baby’s risk of allergies.
See tips on how to breastfeed

Common Myths and Concerns about Breastfeeding

A myth is a belief that is not based on fact. New mothers and fathers have many common breastfeeding questions. We try to answer some of them here. If you still have questions, talk to a public health nurse, public health nutritionist, or someone who offers breastfeeding support in your town or city.

Will I be able to breastfeed? If you WANT to breastfeed your baby, your milk will arrive and your baby will breastfeed. There are some medical problems that prevent some women from breastfeeding. Examples are a mother who is addicted to drugs or alcohol, is having treatment for cancer, or is infected with HIV. A breast reduction may also decrease milk supply.

Are my breasts too small? The size of a mother’s breasts does not matter. Big or small, they can produce all the milk your baby needs. You need to start to breastfeed your baby very soon after birth. The more often you breastfeed, the more milk there will be.

Are my nipples the right shape? The shape of your nipples is not likely to be a problem. Your baby’s sucking will make the nipple and the dark skin around it (areola) softer as you breastfeed. Your baby will do most of the work if your nipple needs to be different from its normal shape.

Will breastfeeding make my breasts sag? This is one of the myths about breastfeeding. The hormones of pregnancy, not breastfeeding, affect the breasts and may make them sag. A good support bra will help. You can expect your breasts to return to their normal (or almost normal size) when you stop breastfeeding.

Does breastfeeding take a lot of time? Some people say that breastfeeding “ties you down.” In fact, many women like the fact that breastfeeding gives them more freedom than formula feeding! All new mothers are limited by feedings, the baby’s demands and being tired. The first few weeks with a baby are filled with change and joy. This is true for all new mothers!

Do I need to eat special food? No. All you need to do is eat healthy food and drink enough fluids. When you eat well, using Canada’s Food Guide as your guide, your body will be healthy and you will be able to nourish your baby.

What about smoking and breastfeeding? When you are pregnant, you should stop smoking. After your baby is born, the harmful effects of smoking get passed along to your baby in breast milk. Heavy smoking (more than 20 cigarettes a day), may make your baby feel like throwing up (nausea), throw up (vomit), have stomach cramps, and the runs (diarrhea). Smoking will also decrease the amount of milk you produce. The smoke from your cigarettes will increases your baby’s risk of ear infections, colds and Sudden Infant Death Syndrome (SIDS). But, if you do smoke, it is still better to breastfeed than to feed your baby formula. You should know that your baby is more likely to be a smoker when he grows up, if you or your partner smoke.

Will breastfeeding keep me from getting pregnant? Breastfeeding is not an effective method of birth control unless you follow all the steps of the LAM method. See LAM (Lactational Amenorrhea Method). Although you may not have a menstrual period while you are breastfeeding, you could become pregnant. You must use some form of birth control (contraception) if you do not wish to be pregnant. Birth control pills can decrease the amount of milk you produce. Talk with your doctor or public health nurse about the kind of birth control to use while you are breastfeeding. If you decide to use birth control pills, watch for the signs of less milk, such as smaller breast size, or more demand from your baby (outside of growth spurts).

Will my partner be left out? No. At first, when you and your baby are building the milk supply, there are many things he can do to help you. He can also build a close relationship with your baby.

What about my other children? Older children will wonder about breastfeeding if they haven’t seen it before. They may want to talk to you and be near you while you are breastfeeding. Make a snack for them and have them sit next to you to eat it. Suggest that they bring you a book to read or that they do something quiet nearby. Give them special toys at this time. Talk to them about what is happening while you feed. If older children feel left out or jealous this is normal. Make sure they know that you love them and they are important to you. If your children are old enough, they can help to care for the new baby. Teach them to hold or burp the baby. Ask your child to sing while you change the baby’s diaper and to pass you things you need. They could answer the telephone when you are breastfeeding. If your older children have a good experience now, they may decide to breastfeed your grandchildren!


What about going back to work? In New Brunswick many mothers have maternity leave for 4 to 6 months, or longer. On the other hand, women who go to school, have a casual job, or are self-employed may not have paid leave. They may need to return to school or work within the baby’s first month of life. If you must go back to work or school, you can still breastfeed with help from your partner, sitter, relative or friend. For more information about pumping and storing breast milk, talk to your health care provider.
Read More »

ORAL HEALTH DURING PREGNANCY

Congratulations on this exciting and busy time of your life! You have so much to think about during pregnancy that it may be easy to overlook your mouth, but pregnancy can actually make some dental problems worse.

Taking care of your teeth and gums is very important when you are pregnant. Hormonal changes during pregnancy can increase your risk of developing periodontal (gum and bone) disease. Poor oral health may also affect the health of your developing baby.

IMPORTANT FACTS ABOUT ORAL HEALTH DURING PREGNANCY

Pregnant women with periodontal disease may have a higher risk of delivering a pre-term or low birth weight baby

Babies who are pre-term or have a low birth weight have a higher incidence of developmental complications, asthma, ear infections, birth abnormalities, behavioral difficulties and a higher risk of infant death.

Eating well is important for your oral health

It can also help to build strong teeth and bones in your developing baby. During pregnancy, you need to eat the right kinds of food and in the right amounts—making sure to get enough calcium, vitamins A, C and D, as well as protein and phosphorous. Taking a multivitamin can help.

Regular dental checkups and cleanings by your dental professional are the best ways to detect and prevent periodontal disease

Schedule a checkup in your first trimester to have your teeth cleaned and your oral health assessed. If you require dental work, the best time to schedule it is between the fourth and sixth month of your pregnancy (the second trimester).  X-rays of your mouth should only be taken in an emergency.

Morning sickness can cause tooth decay

Stomach acid left on the teeth can damage the surface of your teeth and promote tooth decay. If you vomit, rinse your mouth with water or with a fluoride mouthwash as soon as you can afterward.

Recommendations: Brush your teeth at least twice a day with a soft toothbrush using a fluoride toothpaste. Carefully clean your teeth at the gum line, where gum disease starts.  Don’t forget to floss! If you’re not sure if you are brushing and flossing correctly, talk to your dental professional. He or she can show you how, so you can care for your teeth and gums properly. Be sure to continue with routine dental check-ups during and after your pregnancy. 

COMMON QUESTIONS ABOUT ORAL HEALTH

Will it hurt my teeth if I eat between meals?

No. It’s good for pregnant women to eat healthy snacks between meals so they can meet their daily nutritional needs.  Just try to avoid soft, sweet and sticky snacks that are high in carbohydrates and sugar. And remember to clean your teeth after snacking to prevent cavities.

Is it safe to have an x-ray while I’m pregnant?

It is a good idea to avoid routine dental x-rays while you’re pregnant. In the event of a dental emergency, however, an x-ray may be essential. If this happens, your dental professional will shield your abdomen with a lead apron to protect your baby from exposure to radiation.

Why do my gums keep bleeding?

Hormone changes during pregnancy can affect the gums, making them more sensitive and inflamed in response to bacteria along the gum line. This can lead to red, swollen gums that bleed easily. “Pregnancy gingivitis” often appears between the third and ninth month of pregnancy. Gently brushing along the gum line when you brush your teeth can help tender, bleeding gums. Gum problems usually disappear after childbirth. If they continue, contact your dental professional.

I’ve heard that a woman loses one tooth for every pregnancy. Is this true?


No. The calcium needed to make your baby’s teeth comes from what you eat not from your own teeth. If you do not take in enough calcium to meet your baby’s needs, your body will provide this mineral from the calcium of your bones.  Eating enough dairy products and—if necessary—taking a calcium supplement, will ensure both you and your baby will have enough of this mineral without putting your bones at risk.
Read More »
Disclaimer Statements: Statements and opinions expressed on this Web site - Terms and Conditions - are those of the authors and not necessarily those of the publishers or advertisers. The information provided on this Web site should not be construed as medical instruction. Consult appropriate health-care professionals before taking action based on this information. Read more here